您好,登錄后才能下訂單哦!
您好,登錄后才能下訂單哦!
小編給大家分享一下andriod搭建輪詢框架的方法,相信大部分人都還不怎么了解,因此分享這篇文章給大家參考一下,希望大家閱讀完這篇文章后大有收獲,下面讓我們一起去了解一下吧!
很多時候Android應用需要每間隔一段時間向服務器請求數據,如果服務器數據有更新則通知界面變化。Android中最常用的紅點一般采用的就是輪詢,紅點是為了在數據有更新時及時的提醒用戶,比如朋友圈更新,當用戶的朋友圈更新時就會顯示紅點,就是通過移動端不斷的向服務器查詢朋友圈的更新狀態。
相關知識點
在實現輪詢框架時會主要會要到下面兩個類,會結合輪詢框架對這三個類進行講解,在應用中分析會理解更加深刻。
1、IntentService IntentService是一種特殊的Service,繼承了Service并且是一個抽象類,必須創建它的子類才能用。IntentService可以用于執行后臺耗時的任務,當任務執行后會自動停止,IntentService的優先級比一般的線程高,比較適合執行一些優先級高的后臺任務。
2、PendingIntent PendingIntent是延遲的intent,主要用來在某個事件完成后執行特定的Action。PendingIntent包含了Intent及Context,所以就算Intent所屬程序結束,PendingIntent依然有效,可以在其他程序中使用。PendingIntent一般作為參數傳給某個實例,在該實例完成某個操作后自動執行PendingIntent上的Action,也可以通過PendingIntent的send函數手動執行,并可以在send函數中設置OnFinished表示send成功后執行的動作。
輪詢框架實現
要實現輪詢,可以借鑒Handler中的looper機制,如下圖,維護一個消息隊列,循環的從消息隊列中取出消息來執行,輪詢框架可以定時的向消息隊列中加入消息,然后循環中消息隊列中取出消息執行。

可以自己實現一個Looper,但是IntentService中已經包含了一個Looper和一個HandlerThread。因此輪詢框架中使用IntentService作為循環框架。繼承IntentService接口來實現處理消息訪問服務器。
PollingService 用于每次輪詢時向請求服務器接口數據。
public class PollingService extends IntentService {
	public static final String ACTION_CHECK_CIRCLE_UPDATE="ACTION_CHECK_CIRCLE_UPDATE";
	public static final long DEFAULT_MIN_POLLING_INTERVAL = 60000;//最短輪詢間隔1分鐘
 public PollingService() {
  super("PollingService");
 }

 @Override
 protected void onHandleIntent(Intent intent) {
  if (intent == null)
   return;
  final String action = intent.getAction();
  if (ACTION_CHECK_Circle_UPDATE.equals(action)) {
   CheckCircleOfFriendsUpdate();//這個是訪問服務器獲取朋友圈是否更新
  }
 }
}
PollingService 用來處理接到輪詢的消息之后在 onHandleIntent(Intent intent) 中根據Intent所帶有的action不同來進行訪問服務器不同的接口獲取數據。
PollingUtil 用于控制輪詢服務的開始和結束 使用PollingUtil中的startPollingService來根據action和context生成一個PendingIntent,并將PendingIntent交給PollingScheduler來處理。PollingScheduler是一個線程池控制類。
public class PollingUtil {
 /**
  * 開始輪詢服務
  */
 public static void startPollingService(final Context context, String action) {
   //包裝需要執行Service的Intent
   Intent intent = new Intent(context, PollingService.class);
   intent.setAction(action);
   PendingIntent pendingIntent = PendingIntent.getService(context, 0,
     intent, PendingIntent.FLAG_UPDATE_CURRENT);
   PollingScheduler.getInstance().addScheduleTask(pendingIntent, 0, PollingService.DEFAULT_MIN_POLLING_INTERVAL);
  }
 }
 /**
  * 停止輪詢服務
  *
  * @param context
  */
 public static void stopPollingServices(Context context, String action) {
   PollingScheduler.getInstance().clearScheduleTasks();
  }
 }
PollingScheduler實現定時向IntentService的Looper中加入消息 PollingScheduler中生成一個單線程池,addScheduleTask中定時的執行pendingIntent.send(),其中PendingIntent是由 PendingIntent pendingIntent = PendingIntent.getService(context, 0,intent, PendingIntent.FLAG_UPDATE_CURRENT); 生成的,pendingIntent.send()函數會調用Service.startService()來開啟一個服務。
public class PollingScheduler {
 private static PollingScheduler sInstance;
 private ScheduledExecutorService mScheduler;

 private PollingScheduler() {
  mScheduler = Executors.newSingleThreadScheduledExecutor();
 }

 public static synchronized PollingScheduler getInstance() {
  if (sInstance == null) {
   sInstance = new PollingScheduler();
  }
  if (sInstance.mScheduler.isShutdown()) {
   sInstance.mScheduler = Executors.newSingleThreadScheduledExecutor();
  }
  return sInstance;
 }

 public void addScheduleTask(final PendingIntent pendingIntent, long initialDelay, long period) {
  Runnable command = new Runnable() {
   @Override
   public void run() {
    try {
     pendingIntent.send();
    } catch (PendingIntent.CanceledException e) {
     e.printStackTrace();
    }
   }
  };
  mScheduler.scheduleAtFixedRate(command, initialDelay, period, TimeUnit.MILLISECONDS);
 }

 public void clearScheduleTasks() {
  mScheduler.shutdownNow();
 }
}
代碼分析
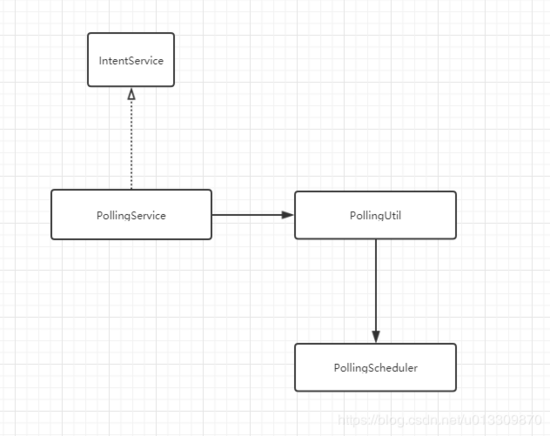
先給出類圖之間的關系如下:

PollingService繼承了IntentService,并且在PollingUtil的startPollingService方法中通過 Intent intent = new Intent(context, PollingService.class); 和將PendingIntent 與PollingService關聯起來,并將PendingIntent加入到定時執行的線程池中,在PollingScheduler 中使用 pendingIntent.send();
由于PendingIntent與PollingService關聯,所以執行pendingIntent.send()的時候會調用PollingIntentServide中的onStart()方法。onStart()方法是IntentService中的方法,代碼如下:
 @Override
 public void onStart(@Nullable Intent intent, int startId) {
  Message msg = mServiceHandler.obtainMessage();
  msg.arg1 = startId;
  msg.obj = intent;
  mServiceHandler.sendMessage(msg);
 }
在onstart()中有一個 mServiceHandler.sendMessage(msg); ,找到mServiceHandler的生成位置:
 @Override
 public void onCreate() {
  super.onCreate();
  HandlerThread thread = new HandlerThread("IntentService[" + mName + "]");
  thread.start();

  mServiceLooper = thread.getLooper();
  mServiceHandler = new ServiceHandler(mServiceLooper);
 }
在IntentService的onCreate方法中生成了一個HandlerThread,一個mServiceLooper,一個mServiceHandler,其中mServiceHandler.sendMessage(msg)中的msg都會放到mServiceLooper,執行時從mServiceLooper中取出執行,其中ServiceHandler 的代碼如下
 private final class ServiceHandler extends Handler {
  public ServiceHandler(Looper looper) {
   super(looper);
  }

  @Override
  public void handleMessage(Message msg) {
   onHandleIntent((Intent)msg.obj);
   stopSelf(msg.arg1);
  }
 }
handleMessage(Message msg)中會調用onHandleIntent((Intent)msg.obj);方法,也就是在PollingService中重寫的onHandleIntent方法。 因此我們在addScheduleTask中不斷的執行pending.send()方法,會不斷的調用IntentService中的onStart方法中的mServiceHandler.sendMessage(msg);不斷的向消息隊列中發消息,然后在onHandleIntent處理消息。 這樣一個輪詢框架就完成了。
以上是“andriod搭建輪詢框架的方法”這篇文章的所有內容,感謝各位的閱讀!相信大家都有了一定的了解,希望分享的內容對大家有所幫助,如果還想學習更多知識,歡迎關注億速云行業資訊頻道!
免責聲明:本站發布的內容(圖片、視頻和文字)以原創、轉載和分享為主,文章觀點不代表本網站立場,如果涉及侵權請聯系站長郵箱:is@yisu.com進行舉報,并提供相關證據,一經查實,將立刻刪除涉嫌侵權內容。