您好,登錄后才能下訂單哦!
您好,登錄后才能下訂單哦!
基于Java語言實現Socket通信
由于近日項目需求,需要在服務器中增加Socket通信的功能,接收硬件設備發送的心跳包和相關數據,因此又重新對Java的網絡編程進行了復習,根據項目的實際情況做了簡化的編程,實現了簡單的通信過程。
1. Socket通信原理
源IP地址和目的IP地址以及源端口號和目的端口號的組合稱為套接字。其用于標識客戶端請求的服務器和服務。
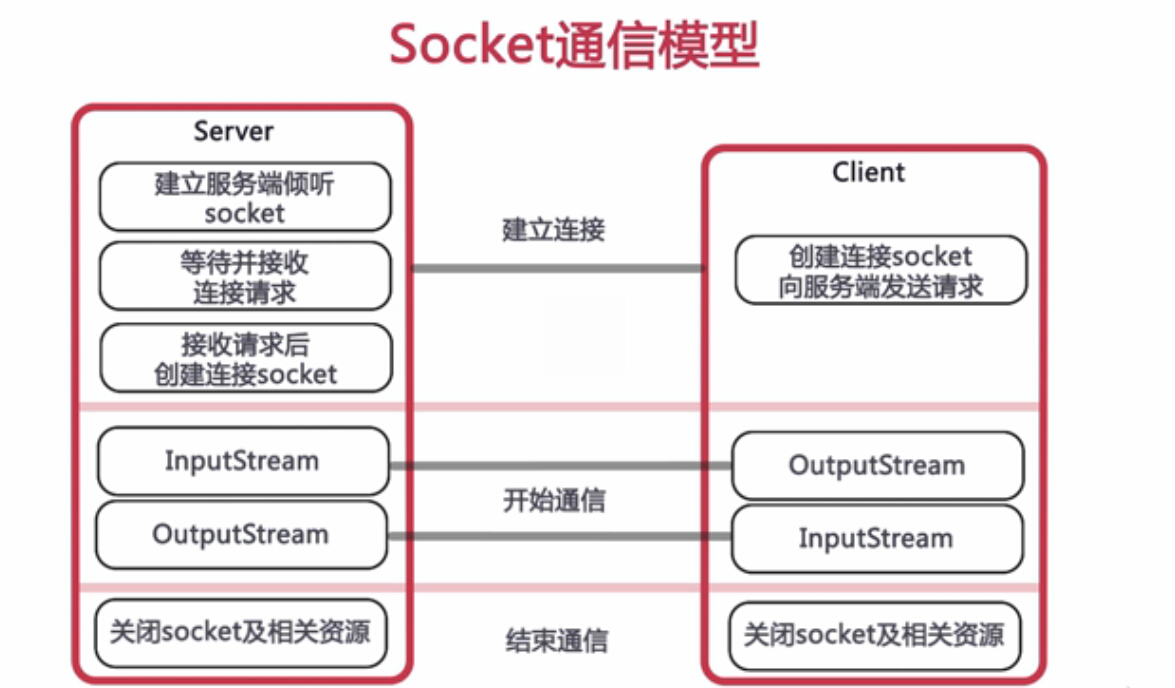
以下是通過Socket套接字實現客戶端與服務器端通信的示意圖:

在實際應用中,客戶端會通過訪問服務器的IP和PORT連接到服務器端,這個過程在服務器和客戶端之間創建一個Socket,然后通過I/O數據流實現數據傳輸,也就是Socket的通信過程。
2. 服務器端
服務器端模擬接收硬件設備傳輸的心跳包(一個長度為10的字節數組),服務器端會獲取到心跳包以及硬件設備的地址和端口號。
public class Server extends Thread{
  //服務器端口號
  private int port;
  private ServerSocket server = null;
  public Server(){
    //創建一個服務器,同時可以接收10個設備發送的數據
    server = new ServerSocket(port,10);
    System.out.println("Socket服務器啟動,開始接受數據");
  }
  @Override
  public void run(){
    while (true) {
      Socket socket = null;
      InputStream inputStream = null;
      OutputStream outputStream = null;
      byte[] inputData = new byte[1024];
      try {
        //接收Socket數據
        socket = server.accept();
        //獲取遠程采集機的IP和端口號
        String remoteAddress = socket.getInetAddress().toString();
        int remotePort = socket.getPort();
        inputStream = socket.getInputStream();
        //獲取傳入的數據長度
        int length = inputStream.read(inputData);
        //創建輸出流向客戶端返回信息
        outputStream = socket.getOutputStream();
        if (length == 10) {
          //如果長度等于10,說明傳入的是心跳包
          System.out.println("接收到心跳包,客戶端信息["+remoteAddress+":"+remotePort+"]");
          outputStream.write("success".getBytes());
        } else {
          System.out.println("接收的信息有誤.");
          outputStream.write("failed".getBytes());
        }
      } catch (IOException e) {
        e.printStackTrace();
      } finally {
        try {
          if (inputStream != null) {
            inputStream.close();
          }
          if (outputStream != null) {
            outputStream.close();
          }
          if (socket != null) {
            socket.close();
          }
        } catch (IOException e) {
          e.printStackTrace();
        }
      }
    }
  }
  //省略Getter和Setter方法
}
3. 客戶端
客戶端負責每隔一段時間向服務器發送一個心跳包。
public final class Client {
  private String address = "";
  private int port = 0;
  private Socket socket = null;
  private Client() {
  }
  private Client(String address, int port) throws IOException {
    this.address = address;
    this.port = port;
    this.socket = new Socket(address, port);
  }
  public static byte[] sendCommand(String address, int port, byte[] data) {
    Client client = null;
    OutputStream outputStream = null;
    InputStream inputStream = null;
    byte[] recevie = new byte[40];
    try {
      client = new Client(address, port);
      outputStream = client.getSocket().getOutputStream();
      outputStream.write(data);
      System.out.print("Send Data Success");
      inputStream = client.getSocket().getInputStream();
      inputStream.read(recevie);
    } catch (IOException e) {
      e.printStackTrace();
    } finally {
      try {
        inputStream.close();
        outputStream.close();
        client.getSocket().close();
      } catch (IOException ioe) {
        System.out.print("IOE when closing resource");
      }
    }
    return recevie;
  }
  /**
   * 測試函數
   **/
  public static void test() {
    for (int i = 0; i < 10; i++) {
      //服務器地址和IP
      String address = "127.0.0.1";
      int port = 9000;
      //心跳包
      byte[] data = "#$*beat001".getBytes();
      String receive = new String(Client.sendCommand(address, port, data));
      System.err.println("第" + i + "次發送心跳包" + receive);
      try {
        //每隔2分鐘發送一個心跳包
        Thread.sleep(2 * 60 * 1000);
      } catch (InterruptedException e) {
        e.printStackTrace();
      }
    }
  }
  //省略Getter和Setter方法
}
4. 小結
目前的這種方式比較像目前共享單車的通信模式,通過心跳包來獲取Client的IP和PORT,然后Server就可以通過心跳包上傳的IP和PORT主動的向Client通信了。其他的物聯網項目也可以使用這樣的方式,這樣就可以實現主動的與物聯網設備的通信了,只需要規定好協議和傳送數據了。
總結
以上就是這篇文章的全部內容了,希望本文的內容對大家的學習或者工作具有一定的參考學習價值,謝謝大家對億速云的支持。如果你想了解更多相關內容請查看下面相關鏈接
免責聲明:本站發布的內容(圖片、視頻和文字)以原創、轉載和分享為主,文章觀點不代表本網站立場,如果涉及侵權請聯系站長郵箱:is@yisu.com進行舉報,并提供相關證據,一經查實,將立刻刪除涉嫌侵權內容。