您好,登錄后才能下訂單哦!
您好,登錄后才能下訂單哦!
這篇文章主要為大家展示了“iOS中如何實現自定義彈出pickerView效果”,內容簡而易懂,條理清晰,希望能夠幫助大家解決疑惑,下面讓小編帶領大家一起研究并學習一下“iOS中如何實現自定義彈出pickerView效果”這篇文章吧。
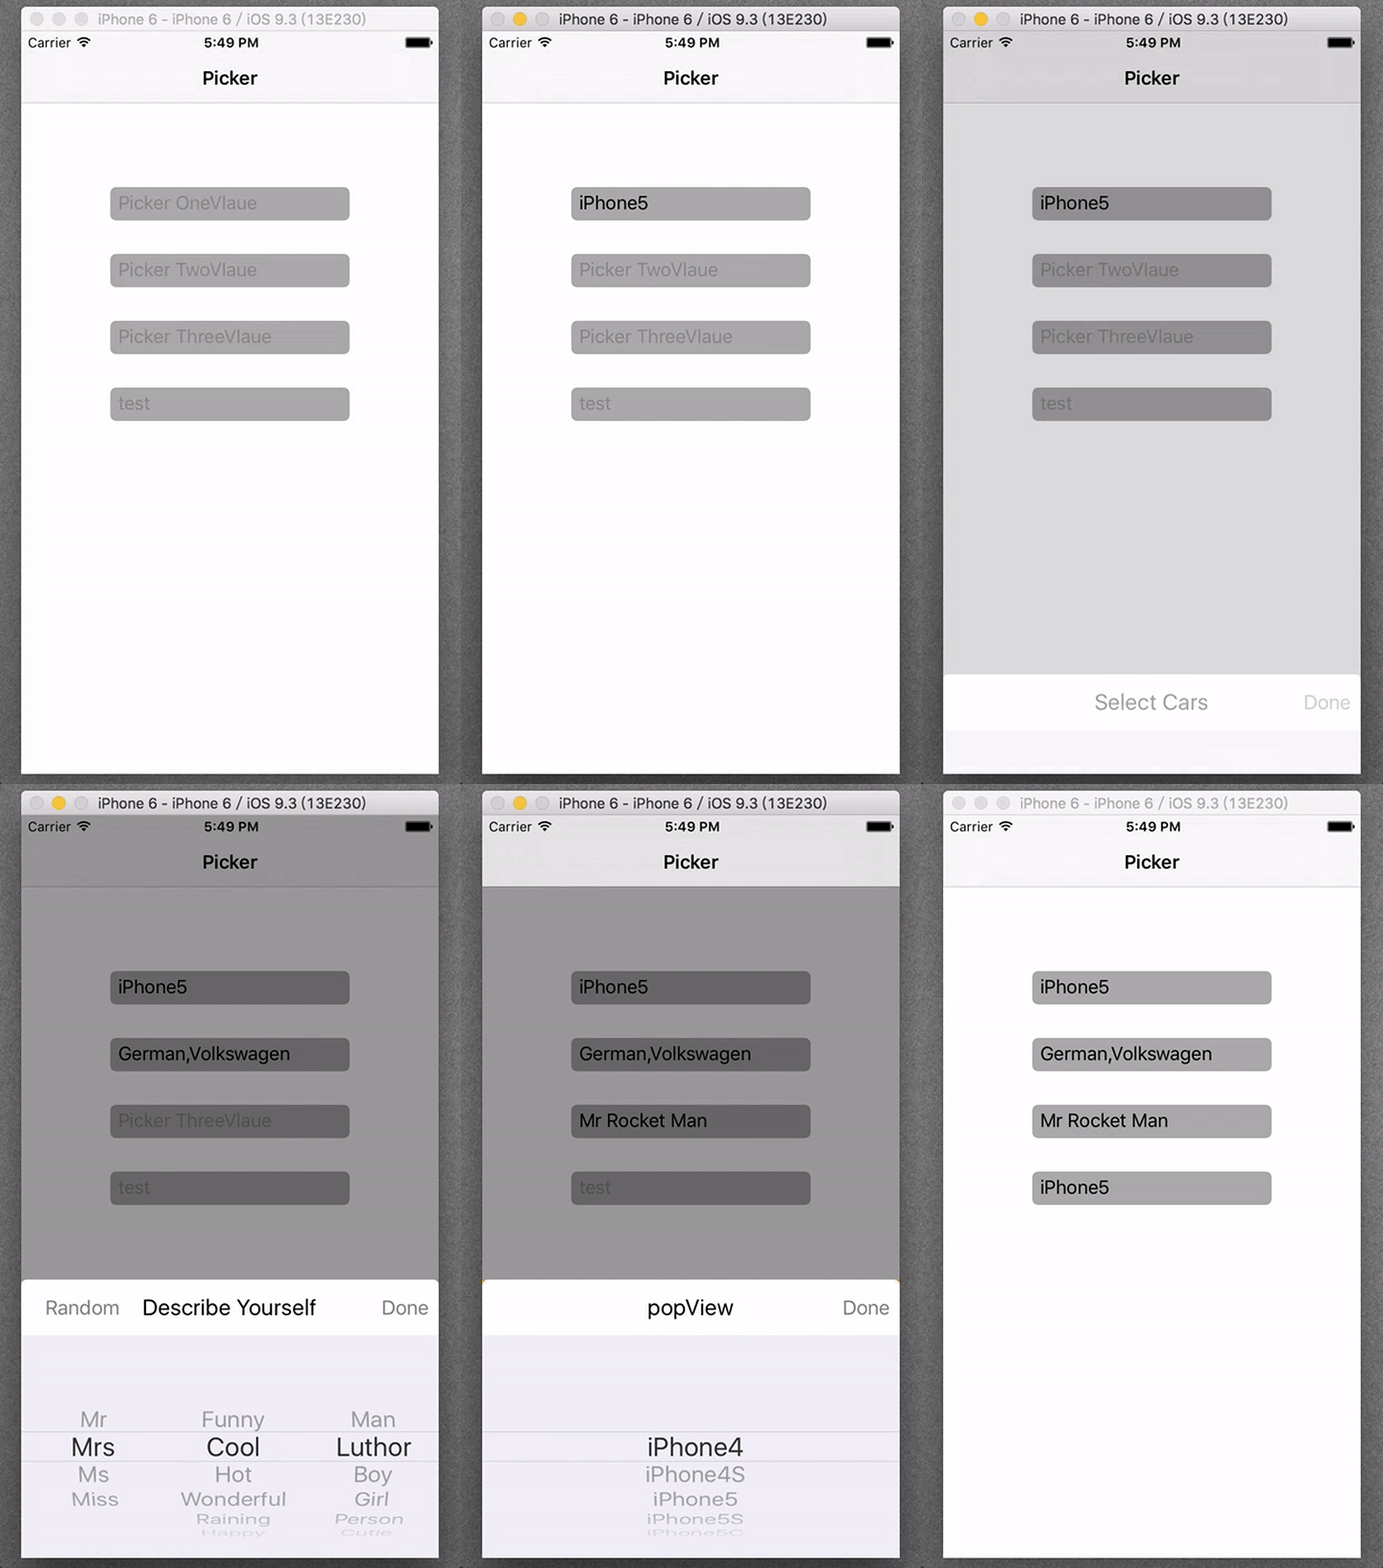
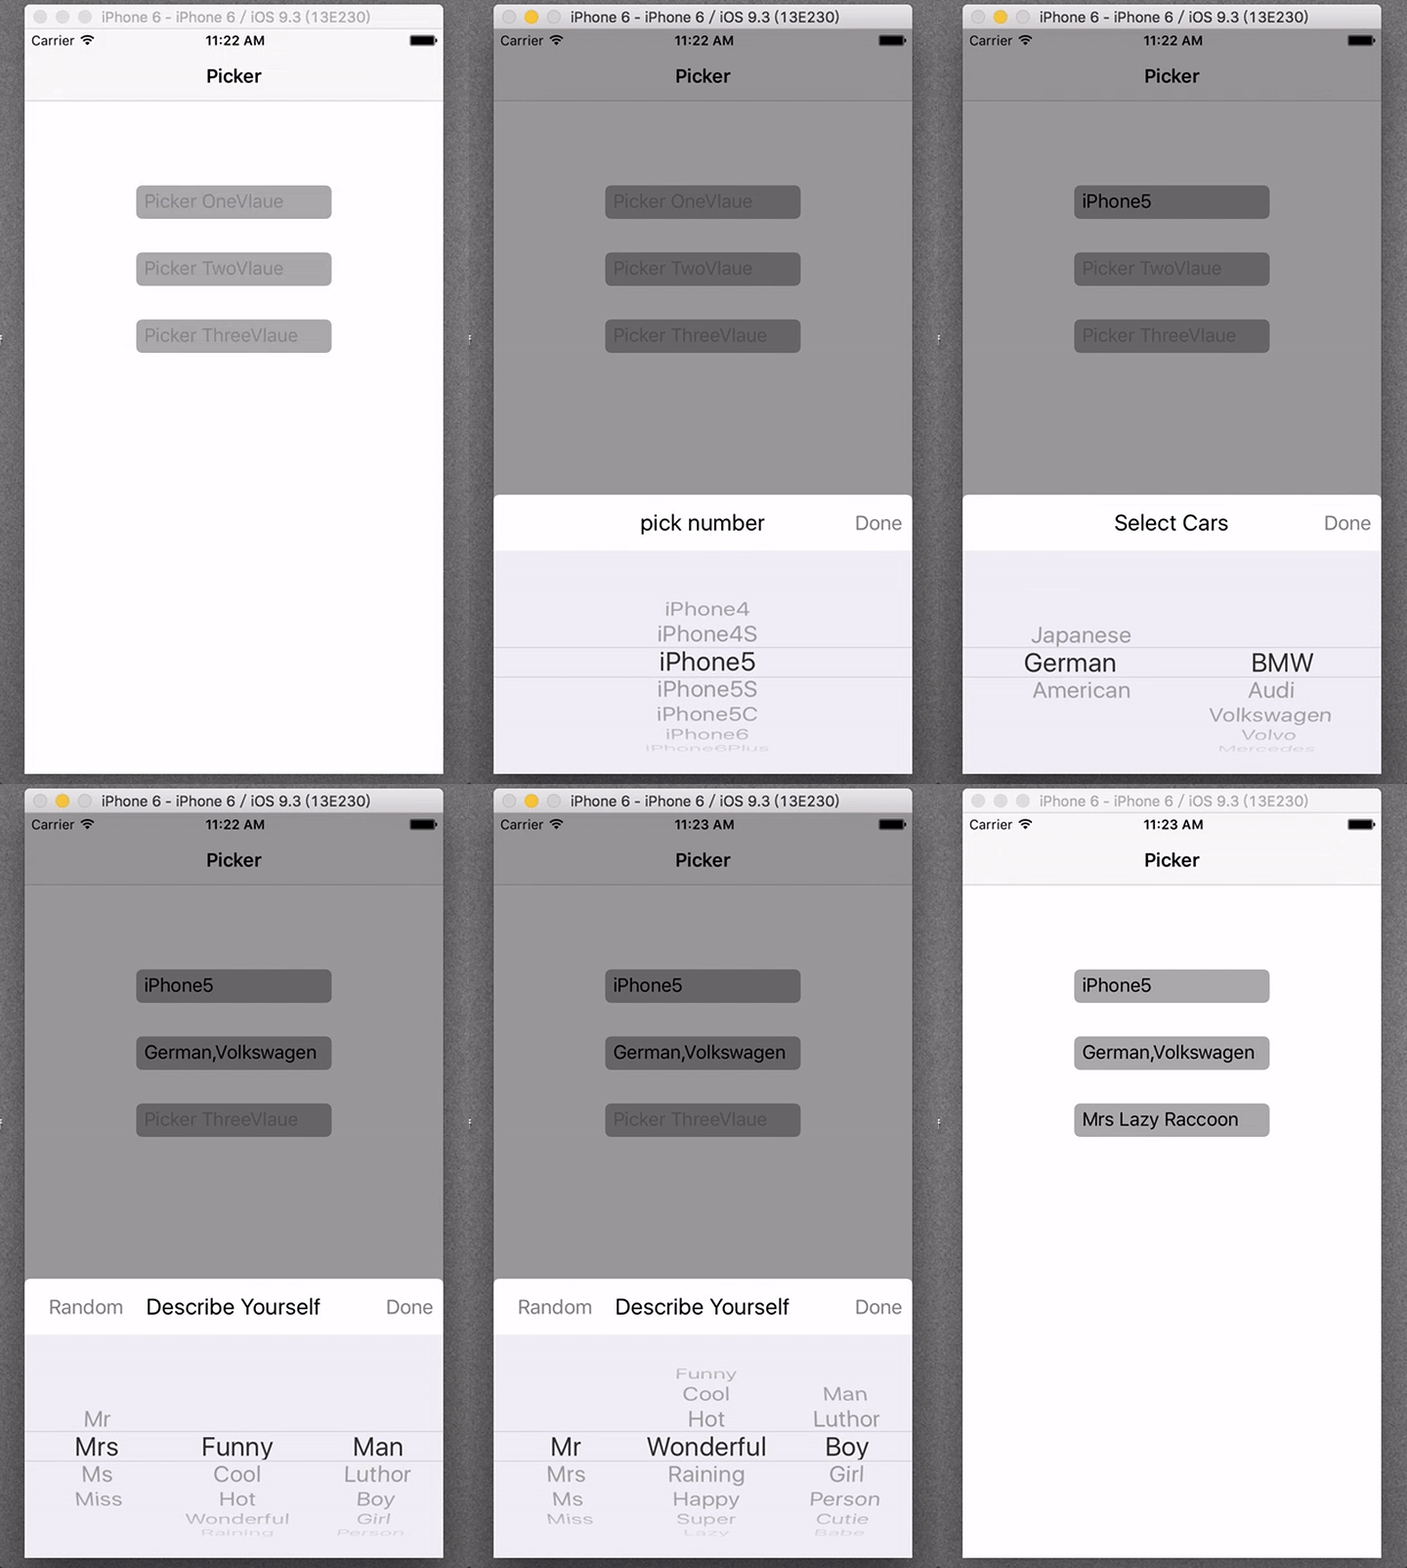
UIPickerView平常用的地方好像也不是很多,頂多就是一些需要選擇的地方,這次項目需要這一個功能,我就單獨寫了一個簡單的demo,效果圖如下:
新增主頁面彈出view,在主頁面添加的代碼
有個小問題就是第四個直接添加在主頁彈出來的view好像被導航欄給覆蓋了,我還沒去研究,就著急的先吧功能寫了。大家諒解下

最初版本

話說我終于弄了gif了,再也不要去截圖每張圖都發一遍了!!
這個demo呢,等于是可以拿來直接用的第三方了吧,只需要傳數據就可以了,彈出的三個框顯示的數據也不一樣,我的封裝能力不行,所以都是單獨寫了,在這里呢,我先把鏈接發上,大家要是沒有耐心的其實可以直接看demo,下載了,看下代碼基本上就會了。YLSPicker。
實現的基本思路呢,其實也挺簡單的。我這里就說下我實現的過程,然后貼上代碼片段,大家可以看一下。
第一步:主頁面的設置
這里其實也沒啥好說的,頁面上三個不能輸入的三個文本框,然后點擊會彈出東西來。
//宏定義
#define YLSRect(x, y, w, h) CGRectMake([UIScreen mainScreen].bounds.size.width * x, [UIScreen mainScreen].bounds.size.height * y, [UIScreen mainScreen].bounds.size.width * w, [UIScreen mainScreen].bounds.size.height * h)
@interface ViewController ()<UITextFieldDelegate>
//聲明
/** text1 */
@property (nonatomic,strong) UITextField *text1;
/** text2 */
@property (nonatomic,strong) UITextField *text2;
/** text3 */
@property (nonatomic,strong) UITextField *text3;
@end
 - (void)viewDidLoad {
 [super viewDidLoad];
 self.title = @"Picker";
 //placeholder數組
 NSArray *placeholderArr = @[@"Picker OneVlaue",@"Picker TwoVlaue",@"Picker ThreeVlaue"];
 //循環添加文本框
 for (int i = 0; i < 3; i ++)
 {
  UITextField *text = [[UITextField alloc]initWithFrame:YLSRect(100/375, (140 + i * 60)/667, 175/375, 30/667)];
  text.borderStyle = UITextBorderStyleRoundedRect;
  text.backgroundColor = [UIColor lightGrayColor];
  text.tag = i + 1000;
  text.placeholder = placeholderArr[i];
  text.delegate = self;
  [self.view addSubview:text];
  if(text.tag == 1000)
  {
   self.text1 = text;
  }else if(text.tag == 1001)
  {
   self.text2 = text;
  }else
  {
   self.text3 = text;
  }
 }
}
很多像我這樣的新手,對textfiled的代理都不是很清楚,像我這個點擊文本框不進行編輯,然后還能彈出自定義view的事件應該在哪里實現呢,答案就是在
//點擊文本框時觸發的事件
- (BOOL)textFieldShouldBeginEditing:(UITextField *)textField;
就這樣,主頁面算是勾畫好了。接下來就是自定義view的部分了。
第二步:實現自定義view
1.創建類YLSOPickerView
2.在.h文件中聲明變量,一個是需要傳入的數組,一個是彈出框的標題。還要聲明兩個方法:
@interface YLSOPickerView : UIView
/** array */
@property (nonatomic,strong) NSArray *array;
/** title */
@property (nonatomic,strong) NSString *title;
//快速創建
+(instancetype)pickerView;
//彈出
-(void)show;
@end
3.接下來的就是最主要的工作,就是.m文件的編寫
宏定義
#define YLSRect(x, y, w, h) CGRectMake([UIScreen mainScreen].bounds.size.width * x, [UIScreen mainScreen].bounds.size.height * y, [UIScreen mainScreen].bounds.size.width * w, [UIScreen mainScreen].bounds.size.height * h)
#define YLSFont(f) [UIFont systemFontOfSize:[UIScreen mainScreen].bounds.size.width * f]
#define YLSColorAlpha(r,g,b,a) [UIColor colorWithRed:(r)/255.0 green:(g)/255.0 blue:(b)/255.0 alpha:(a)]
#define YLSMainBackColor [UIColor colorWithRed:240/255.0 green:239/255.0 blue:245/255.0 alpha:1]
#define BlueColor [UIColor colorWithRed:0/255.0 green:122/255.0 blue:255/255.0 alpha:1]
#define ClearColor [UIColor clearColor]
聲明需要用到的控件,遵守響應的協議
@interface YLSOPickerView()<UIPickerViewDelegate,UIPickerViewDataSource>
/** view */
@property (nonatomic,strong) UIView *topView;
/** button */
@property (nonatomic,strong) UIButton *doneBtn;
/** pickerView */
@property (nonatomic,strong) UIPickerView *pickerView;
/** 選擇傳回的值 */
@property (nonatomic,strong) NSString *result;
@end
實現init方法和創建方法
//快速創建
+ (instancetype)pickerView
{
 return [[self alloc]init];
}
-(instancetype)initWithFrame:(CGRect)frame
{
 self = [super initWithFrame:YLSRect(0, 0, 1, 917/667)];
 if (self)
 {
  self.backgroundColor = YLSColorAlpha(0, 0, 0, 0.4);
 }
 return self;
}
這里呢我要說一下的是,為了達到在點擊文本框從下彈出的一個動態效果,所以起初的時候我將整個view的長度設置成了一個屏幕的長度加上選擇器的長度,在彈出方法中我將整個view上移著添加進屏幕。這樣會有好看點效果
添加頁面控件,設置樣式位置等
-(void)layoutSubviews
{
 [super layoutSubviews];
 self.topView = [[UIView alloc]initWithFrame:YLSRect(0, 667/667, 1, 250/667)];
 self.topView.backgroundColor = [UIColor whiteColor];
 [self addSubview:self.topView];
 //為view上面的兩個角做成圓角。不喜歡的可以注掉
 UIBezierPath *maskPath = [UIBezierPath bezierPathWithRoundedRect:self.topView.bounds byRoundingCorners:UIRectCornerTopLeft | UIRectCornerTopRight cornerRadii:CGSizeMake(5, 5)];
 CAShapeLayer *maskLayer = [[CAShapeLayer alloc] init];
 maskLayer.frame = self.topView.bounds;
 maskLayer.path = maskPath.CGPath;
 self.topView.layer.mask = maskLayer;
 self.doneBtn = [UIButton buttonWithType:UIButtonTypeCustom];
 [self.doneBtn setTitle:@"Done" forState:UIControlStateNormal];
 [self.doneBtn setTitleColor:[UIColor grayColor] forState:UIControlStateNormal];
 [self.doneBtn setFrame:YLSRect(320/375, 5/667, 50/375, 40/667)];
 [self.doneBtn addTarget:self action:@selector(quit) forControlEvents:UIControlEventTouchUpInside];
 [self.topView addSubview:self.doneBtn];
 UILabel *titlelb = [[UILabel alloc]initWithFrame:YLSRect(100/375, 0, 175/375, 50/667)];
 titlelb.backgroundColor = ClearColor;
 titlelb.textAlignment = NSTextAlignmentCenter;
 titlelb.text = self.title;
 titlelb.font = YLSFont(20/375);
 [self.topView addSubview:titlelb];
 self.pickerView = [[UIPickerView alloc]init];
 [self.pickerView setFrame:YLSRect(0, 50/667, 1, 200/667)];
 [self.pickerView setBackgroundColor:YLSMainBackColor];
 [self.pickerView setDelegate:self];
 [self.pickerView setDataSource:self];
 [self.pickerView selectRow:0 inComponent:0 animated:YES];
 [self.topView addSubview:self.pickerView];
}
同樣,在這里我把topview的左上和右上兩個角設置成了圓角也就是為了好看點,其實沒啥區別,用的時候可以根據自己的需求來注釋掉啥的。
實現pickerView的協議方法
<UIPickerViewDelegate,UIPickerViewDataSource>
// 返回選擇器有幾列.
- (NSInteger)numberOfComponentsInPickerView:(UIPickerView *)pickerView
{
 return 1;
}
// 返回每組有幾行
- (NSInteger)pickerView:(UIPickerView *)pickerView numberOfRowsInComponent:(NSInteger)component
{
 return [self.array count];
}
#pragma mark - 代理
// 返回第component列第row行的內容(標題)
- (NSString *)pickerView:(UIPickerView *)pickerView titleForRow:(NSInteger)row forComponent:(NSInteger)component
{
 return self.array[row];
}
// 選中第component第row的時候調用
- (void)pickerView:(UIPickerView *)pickerView didSelectRow:(NSInteger)row inComponent:(NSInteger)component
{
 self.result = self.array[row];
}
先現實show方法,然后實現點擊按鈕Done的推出方法
//彈出
- (void)show
{
 [self showInView:[UIApplication sharedApplication].keyWindow];
}
//添加彈出移除的動畫效果
- (void)showInView:(UIView *)view
{
 // 浮現
 [UIView animateWithDuration:0.5 animations:^{
  CGPoint point = self.center;
  point.y -= 250;
  self.center = point;
 } completion:^(BOOL finished) {
 }];
 [view addSubview:self];
}
-(void)quit
{
[UIView animateWithDuration:0.5 animations:^{
self.alpha = 0;
CGPoint point = self.center;
point.y += 250;
self.center = point;
} completion:^(BOOL finished) {
if (!self.result) {
self.result = self.array[0];
}
NSLog(@"%@",self.result);
[[NSNotificationCenter defaultCenter]postNotificationName:@"value" object:self.result];
[self removeFromSuperview];
}];
}在這里呢,需要注意的是,假設你沒有點擊,沒有滑動的話,self.result是空值,所以需要你判斷下,若為空,傳入數組第一個數據,不為空的話就直接傳遞了,另外我用的是通知傳值,因為block傳值我還沒有去學習了解,所以這里就用上我會的一個通知傳值,但是我有個小問題,希望看到的人回答下我,通知一般在什么時候移除比較好呢??
第三步:主頁實現點擊出現的方法,并且接收回傳的值。
主頁面引入頭文件#import “YLSOPickerView.h”
實現點擊彈出的事件
#pragma mark - UITextFieldDelegate
//點擊文本框時觸發的事件,喚起跳出視圖
- (BOOL)textFieldShouldBeginEditing:(UITextField *)textField
{
 if(textField.tag == 1000)
 {
  YLSOPickerView *picker = [[YLSOPickerView alloc]init];
  picker.array = @[@"iPhone4",@"iPhone4S",@"iPhone5",@"iPhone5S",@"iPhone5C",@"iPhone6",@"iPhone6Plus",@"iPhone6S",@"iPhone6SPlus"];
  picker.title = @"pick number";
  [picker show];
 }
 return NO;
}
在- (void)viewDidLoad方法中接收通知,實現通知方法
[[NSNotificationCenter defaultCenter]addObserver:self selector:@selector(getValue:) name:@"value" object:nil];
-(void)getValue:(NSNotification *)notification
{
 self.text1.text = notification.object;
}
這樣一來,一個簡單的挑選單個數據的自定義選擇器就算是大功告成了,使用起來有些許不方法,大家如果使用的話可以自己修改修改,此外要是有什么好的改進方法,大家也可以教教我,一起學習學習
Others
在另外兩個文本框點擊出現的選擇器本質上還是與上面寫的一樣,只是第二個數有聯動效果的,第一組數據滑動的時候,第二組數據也跟著換,那我在寫的時候傳入的數據是字典形式的,然后另外設置兩個數組將字典里的數據接收了,當然,開始就傳數組形式的數據也可以,只需要在協議方法里面修改響應的代碼就可以了。其他沒什么變化。
傳值的時候
第三個文本框也同樣與前兩個本質上行沒有啥區別,只是在上面多了一個隨機按鈕,隨機按鈕點擊事件實現也挺簡單的
self.ranBtn = [UIButton buttonWithType:UIButtonTypeCustom];
 [self.ranBtn setTitle:@"Random" forState:UIControlStateNormal];
 [self.ranBtn setTitleColor:[UIColor grayColor] forState:UIControlStateNormal];
 [self.ranBtn setFrame:YLSRect(5/375, 5/667, 100/375, 40/667)];
 [self.ranBtn addTarget:self action:@selector(random:) forControlEvents:UIControlEventTouchUpInside];
 [self.topView addSubview:self.ranBtn];
-(void)random:(UIPickerView *)picker
{
 for (int i = 0; i < 3; i++)
 {
  // 取出第i列的行數
  NSInteger count = [self.array[i] count];
  int random = arc4random_uniform((u_int32_t)count);
  //不會觸發代理的選中方法
  [self.pickerView selectRow:random inComponent:i animated:YES];
  //label數據刷新
  [self pickerView:picker didSelectRow:random inComponent:i];
 }
}
以上是“iOS中如何實現自定義彈出pickerView效果”這篇文章的所有內容,感謝各位的閱讀!相信大家都有了一定的了解,希望分享的內容對大家有所幫助,如果還想學習更多知識,歡迎關注億速云行業資訊頻道!
免責聲明:本站發布的內容(圖片、視頻和文字)以原創、轉載和分享為主,文章觀點不代表本網站立場,如果涉及侵權請聯系站長郵箱:is@yisu.com進行舉報,并提供相關證據,一經查實,將立刻刪除涉嫌侵權內容。