您好,登錄后才能下訂單哦!
您好,登錄后才能下訂單哦!
小編給大家分享一下eclipse中web項目如何實現Javaweb購物車,相信大部分人都還不怎么了解,因此分享這篇文章給大家參考一下,希望大家閱讀完這篇文章后大有收獲,下面讓我們一起去了解一下吧!
具體實現:
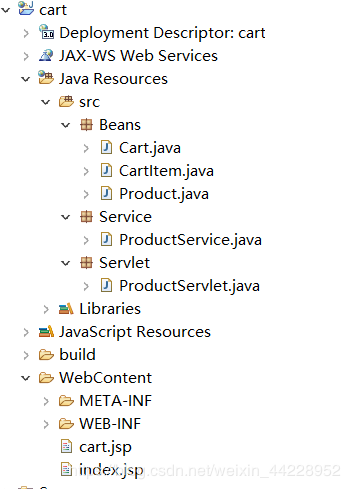
首先我們要看一下項目整體的結構

下面我們要先創建實體類,就是我們的商品、預購商品和購物車這三個實體類。
Beans
Cart類(這個類是購物車實體類,包含了購物車中添加的商品和總計兩個屬性。)
package Beans;

import java.util.HashMap;

public class Cart {
 private HashMap<String,CartItem> cartItems=new HashMap<String,CartItem>();//購物車中添加的商品

 private double total;//總計

 public HashMap<String, CartItem> getCartItems() {
 return cartItems;
 }
 public void setCartItems(HashMap<String, CartItem> cartItems) {
 this.cartItems = cartItems;
 }

 public double getTotal() {
 return total;
 }

 public void setTotal(double total) {
 this.total = total;
 }

}
CartItem類(這個是購物車中添加的商品類,包含有商品、商品個數和小計)
package Beans;

public class CartItem {
  private Product product;//商品

 private int buyNum;//個數

 private double subTotal;//小計

 public Product getProduct() {
 return product;
 }

 public void setProduct(Product product) {
 this.product = product;
 }

 public int getBuyNum() {
 return buyNum;
 }

 public void setBuyNum(int buyNum) {
 this.buyNum = buyNum;
 }

 public double getSubTotal() {
 return subTotal;
 }

 public void setSubTotal(double subTotal) {
 this.subTotal = subTotal;
 }

}
Product類 (這里是具體的商品類,包含有商品編號、商品名和商品價格三個屬性)
package Beans;

public class Product {
 private String pid;//商品編號
 private String name;//商品名
 private double price;//商品價格
 public String getPid() {
 return pid;
 }
 public void setPid(String pid) {
 this.pid = pid;
 }
 public String getName() {
 return name;
 }
 public void setName(String name) {
 this.name = name;
 }
 public double getPrice() {
 return price;
 }
 public void setPrice(double price) {
 this.price = price;
 }

 public Product(String pid,String name,double price) {
 // TODO Auto-generated constructor stub
 this.pid = pid;
 this.name = name;
 this.price = price;
 }

}
Service
這個包下面只有一個類,主要的作用是存入商品,并能根據商品編號找到商品。
ProductService類
package Service;

import java.util.HashMap;

import Beans.CartItem;
import Beans.Product;

public class ProductService {

 private HashMap<String,CartItem> cartItems=new HashMap<String,CartItem>();

 public ProductService() //構造函數
 {
  CartItem cartltem1=new CartItem();
  CartItem cartltem2=new CartItem();
  Product product1=new Product("001","Mobilephone",1000);
  Product product2=new Product("002","Watch",100);
  cartltem1.setProduct(product1);
  cartltem2.setProduct(product2);
 cartItems.put("001",cartltem1);
 cartItems.put("002", cartltem2);
 }

 public Product findProductbypid(String pid)
 {
 CartItem cartItem=cartItems.get(pid);
 Product product=cartItem.getProduct();
 return product;
 }
}
Servelet
ProductServlet類 (在這經常會報錯 1、httpservelet類無法繼承;因為httpservelet類是在tomcat下的所以這里可能是tomcat沒有配置入項目或者httpservelet類沒有導入,所以要重新導入tomcat。2、dopost和doget兩種基礎方法使用錯誤,導致頁面傳來的數據無法進行處理;解決:servelet類中的方法要與頁面選擇方法一致。3、亂碼,中文亂碼;解決:中文的編碼最好用utf-8【servlet改編碼是對req、resp設置】,并且頁面和后臺采用的編碼要一致。)
這里的路徑配置采用的是標簽(方便)、也可采用.xml配置.
package Servlet;


import java.io.IOException;
import java.util.HashMap;

import javax.servlet.ServletException;
import javax.servlet.annotation.WebServlet;
import javax.servlet.http.HttpServlet;
import javax.servlet.http.HttpServletRequest;
import javax.servlet.http.HttpServletResponse;
import javax.servlet.http.HttpSession;

import Beans.Cart;
import Beans.CartItem;
import Beans.Product;
import Service.ProductService;


@WebServlet("/productServlet")
public class ProductServlet extends HttpServlet{

 /**
 *
 */
 private static final long serialVersionUID = 1L;


 @Override
 protected void doPost(HttpServletRequest req, HttpServletResponse resp) throws ServletException, IOException {

 ProductService productService = new ProductService();


 String pid=(String)req.getParameter("Product");
 int buyNum=Integer.parseInt(req.getParameter("number"));
 HttpSession session=req.getSession();
 Cart cart=(Cart)session.getAttribute("cart");
 if(cart==null) {
 cart=new Cart();
 }
 CartItem cartItem=new CartItem();
 cartItem.setBuyNum(buyNum);

 Product product=productService.findProductbypid(pid);
 cartItem.setProduct(product);
 double subTotal=product.getPrice()*buyNum;
 cartItem.setSubTotal(subTotal);

 HashMap<String, CartItem> cartItems=cart.getCartItems();
 double newSubTotal=0;
 if(cartItems.containsKey(pid)) {
 CartItem item=cartItems.get(pid);

 int oldBuyNum= item.getBuyNum();
 oldBuyNum=oldBuyNum+buyNum;
 item.setBuyNum(oldBuyNum);

 double oldSubTotal= item.getSubTotal();
 newSubTotal=buyNum*product.getPrice();
 oldSubTotal=oldSubTotal+newSubTotal;
 item.setSubTotal(oldSubTotal);
 }
 else {
 cartItems.put(pid, cartItem);
 newSubTotal=buyNum*product.getPrice();
 }
 double total=cart.getTotal()+newSubTotal;
 cart.setTotal(total);
 cart.setCartItems(cartItems);
 session.setAttribute("cart", cart);
 req.getRequestDispatcher("cart.jsp").forward(req, resp);
 }

}
cart.jsp
這里一定要導入其他類 ,用<%@ page import=""%>標簽。
<%@page import="org.apache.jasper.tagplugins.jstl.core.ForEach"%>
<%@ page language="java" contentType="text/html; charset=ISO-8859-1"
 pageEncoding="ISO-8859-1"%>
 <%@
 page import="Beans.Cart"
 %>
 <%@
 page import="Beans.CartItem"
 %>
 <%@
 page import="Beans.Product"
 %>
 <%@page import="java.util.*"%>
<!DOCTYPE html>
<html>
<head>
<meta charset="ISO-8859-1">
<title>Insert title here</title>
</head>
<body>

<% Cart cart=(Cart)request.getSession().getAttribute("cart");
  if(cart==null) {
 %>
 <p>It is nothing!</p>
 <%
  }
  else{
  HashMap<String, CartItem> cartItems=cart.getCartItems();
  double total=cart.getTotal();
  %>
  Your product list:<br>
  <%
  Set<String> keys=cartItems.keySet();
  Iterator<String> iter = keys.iterator();
  while(iter.hasNext()){
  String key= iter.next();
  CartItem cartItem=cartItems.get(key);
  Product product=cartItem.getProduct();
  out.print(product.getName()+" ") ;
  out.println("price:"+product.getPrice()+"$") ;
  out.println("number:"+cartItem.getBuyNum());
  };
  %>
 <br>
 <%
 out.print("    total:"+total+"$");
 }
 %>


</body>
</html>
index.jsp
在action=“”屬性的配置是不能只寫后臺配置的“/productServlet”路徑,一定要加上<%=request.getContextPath() %>,否則有可能找不著路徑。
<%@ page language="java" contentType="text/html; charset=ISO-8859-1"
 pageEncoding="ISO-8859-1"%>
<!DOCTYPE html>
<html>
<head>
<meta charset="ISO-8859-1">
<title>Insert title here</title>
</head>
<body>
 Please select the item you want to buy.<br>
 <form action="<%=request.getContextPath() %>/productServlet" method="post">
 Mobile phone(1000$)
 <input name="Product" type="radio" value="001" checked="checked"><br>
 Watch(100$)
 <input name="Product" type="radio" value="002"><br>
 please input the number!
 number:<input name="number" type="number"><br>
 <input type="submit" value="ok!">
 </form>
</body>
</html>
以上是“eclipse中web項目如何實現Javaweb購物車”這篇文章的所有內容,感謝各位的閱讀!相信大家都有了一定的了解,希望分享的內容對大家有所幫助,如果還想學習更多知識,歡迎關注億速云行業資訊頻道!
免責聲明:本站發布的內容(圖片、視頻和文字)以原創、轉載和分享為主,文章觀點不代表本網站立場,如果涉及侵權請聯系站長郵箱:is@yisu.com進行舉報,并提供相關證據,一經查實,將立刻刪除涉嫌侵權內容。