您好,登錄后才能下訂單哦!
您好,登錄后才能下訂單哦!
這篇文章主要講解了SpringBoot+WebSocket+Netty實現消息推送的方法,內容清晰明了,對此有興趣的小伙伴可以學習一下,相信大家閱讀完之后會有幫助。
大概實現思路:
下面是具體的代碼實現,基本上每一步操作都配有注釋說明,配合注釋看應該還是比較容易理解的。
第零步:引入Netty的依賴,和一個工具包(只用到了json工具,可用其他json工具代替)
<dependency>
 <groupId>io.netty</groupId>
 <artifactId>netty-all</artifactId>
 <version>4.1.33.Final</version>
</dependency>

<dependency>
 <groupId>cn.hutool</groupId>
 <artifactId>hutool-all</artifactId>
 <version>5.2.3</version>
</dependency>
第一步:在NettyConfig中定義一個channel組,管理所有的channel,再定義一個map,管理用戶與channel的對應關系。
package com.sixj.nettypush.config;

import io.netty.channel.Channel;
import io.netty.channel.group.ChannelGroup;
import io.netty.channel.group.DefaultChannelGroup;
import io.netty.util.concurrent.GlobalEventExecutor;

import java.util.concurrent.ConcurrentHashMap;

/**
 * @author sixiaojie
 * @date 2020-03-28-15:07
 */
public class NettyConfig {
  /**
   * 定義一個channel組,管理所有的channel
   * GlobalEventExecutor.INSTANCE 是全局的事件執行器,是一個單例
   */
  private static ChannelGroup channelGroup = new DefaultChannelGroup(GlobalEventExecutor.INSTANCE);

  /**
   * 存放用戶與Chanel的對應信息,用于給指定用戶發送消息
   */
  private static ConcurrentHashMap<String,Channel> userChannelMap = new ConcurrentHashMap<>();

  private NettyConfig() {}

  /**
   * 獲取channel組
   * @return
   */
  public static ChannelGroup getChannelGroup() {
    return channelGroup;
  }

  /**
   * 獲取用戶channel map
   * @return
   */
  public static ConcurrentHashMap<String,Channel> getUserChannelMap(){
    return userChannelMap;
  }
}第二步:創建NettyServer,定義兩個EventLoopGroup,bossGroup輔助客戶端的tcp連接請求, workGroup負責與客戶端之前的讀寫操作,需要說明的是,需要開啟一個新的線程來執行netty server,要不然會阻塞主線程,到時候就無法調用項目的其他controller接口了。
package com.sixj.nettypush.websocket;

import io.netty.bootstrap.ServerBootstrap;
import io.netty.channel.ChannelFuture;
import io.netty.channel.ChannelInitializer;
import io.netty.channel.EventLoopGroup;
import io.netty.channel.nio.NioEventLoopGroup;
import io.netty.channel.socket.SocketChannel;
import io.netty.channel.socket.nio.NioServerSocketChannel;
import io.netty.handler.codec.http.HttpObjectAggregator;
import io.netty.handler.codec.http.HttpServerCodec;
import io.netty.handler.codec.http.websocketx.WebSocketServerProtocolHandler;
import io.netty.handler.codec.serialization.ObjectEncoder;
import io.netty.handler.stream.ChunkedWriteHandler;
import org.slf4j.Logger;
import org.slf4j.LoggerFactory;
import org.springframework.beans.factory.annotation.Autowired;
import org.springframework.beans.factory.annotation.Value;
import org.springframework.stereotype.Component;

import javax.annotation.PostConstruct;
import javax.annotation.PreDestroy;
import java.net.InetSocketAddress;

/**
 * @author sixiaojie
 * @date 2020-03-28-13:44
 */

@Component
public class NettyServer{
  private static final Logger log = LoggerFactory.getLogger(NettyServer.class);
  /**
   * webSocket協議名
   */
  private static final String WEBSOCKET_PROTOCOL = "WebSocket";

  /**
   * 端口號
   */
  @Value("${webSocket.netty.port:58080}")
  private int port;

  /**
   * webSocket路徑
   */
  @Value("${webSocket.netty.path:/webSocket}")
  private String webSocketPath;

  @Autowired
  private WebSocketHandler webSocketHandler;

  private EventLoopGroup bossGroup;
  private EventLoopGroup workGroup;

  /**
   * 啟動
   * @throws InterruptedException
   */
  private void start() throws InterruptedException {
    bossGroup = new NioEventLoopGroup();
    workGroup = new NioEventLoopGroup();
    ServerBootstrap bootstrap = new ServerBootstrap();
    // bossGroup輔助客戶端的tcp連接請求, workGroup負責與客戶端之前的讀寫操作
    bootstrap.group(bossGroup,workGroup);
    // 設置NIO類型的channel
    bootstrap.channel(NioServerSocketChannel.class);
    // 設置監聽端口
    bootstrap.localAddress(new InetSocketAddress(port));
    // 連接到達時會創建一個通道
    bootstrap.childHandler(new ChannelInitializer<SocketChannel>() {

      @Override
      protected void initChannel(SocketChannel ch) throws Exception {
        // 流水線管理通道中的處理程序(Handler),用來處理業務
        // webSocket協議本身是基于http協議的,所以這邊也要使用http編解碼器
        ch.pipeline().addLast(new HttpServerCodec());
        ch.pipeline().addLast(new ObjectEncoder());
        // 以塊的方式來寫的處理器
        ch.pipeline().addLast(new ChunkedWriteHandler());
        /*
        說明:
        1、http數據在傳輸過程中是分段的,HttpObjectAggregator可以將多個段聚合
        2、這就是為什么,當瀏覽器發送大量數據時,就會發送多次http請求
         */
        ch.pipeline().addLast(new HttpObjectAggregator(8192));
        /*
        說明:
        1、對應webSocket,它的數據是以幀(frame)的形式傳遞
        2、瀏覽器請求時 ws://localhost:58080/xxx 表示請求的uri
        3、核心功能是將http協議升級為ws協議,保持長連接
        */
        ch.pipeline().addLast(new WebSocketServerProtocolHandler(webSocketPath, WEBSOCKET_PROTOCOL, true, 65536 * 10));
        // 自定義的handler,處理業務邏輯
        ch.pipeline().addLast(webSocketHandler);

      }
    });
    // 配置完成,開始綁定server,通過調用sync同步方法阻塞直到綁定成功
    ChannelFuture channelFuture = bootstrap.bind().sync();
    log.info("Server started and listen on:{}",channelFuture.channel().localAddress());
    // 對關閉通道進行監聽
    channelFuture.channel().closeFuture().sync();
  }

  /**
   * 釋放資源
   * @throws InterruptedException
   */
  @PreDestroy
  public void destroy() throws InterruptedException {
    if(bossGroup != null){
      bossGroup.shutdownGracefully().sync();
    }
    if(workGroup != null){
      workGroup.shutdownGracefully().sync();
    }
  }
  @PostConstruct()
  public void init() {
    //需要開啟一個新的線程來執行netty server 服務器
    new Thread(() -> {
      try {
        start();
      } catch (InterruptedException e) {
        e.printStackTrace();
      }
    }).start();
  }
}
第三步: 具體實現業務的WebSocketHandler,具體實現邏輯看注釋
package com.sixj.nettypush.websocket;

import cn.hutool.json.JSONObject;
import cn.hutool.json.JSONUtil;
import com.sixj.nettypush.config.NettyConfig;
import io.netty.channel.ChannelHandler;
import io.netty.channel.ChannelHandlerContext;
import io.netty.channel.SimpleChannelInboundHandler;
import io.netty.handler.codec.http.websocketx.TextWebSocketFrame;
import io.netty.util.AttributeKey;
import org.slf4j.Logger;
import org.slf4j.LoggerFactory;
import org.springframework.stereotype.Component;


/**
 * TextWebSocketFrame類型, 表示一個文本幀
 * @author sixiaojie
 * @date 2020-03-28-13:47
 */
@Component
@ChannelHandler.Sharable
public class WebSocketHandler extends SimpleChannelInboundHandler<TextWebSocketFrame> {
  private static final Logger log = LoggerFactory.getLogger(NettyServer.class);

  /**
   * 一旦連接,第一個被執行
   * @param ctx
   * @throws Exception
   */
  @Override
  public void handlerAdded(ChannelHandlerContext ctx) throws Exception {
    log.info("handlerAdded 被調用"+ctx.channel().id().asLongText());
    // 添加到channelGroup 通道組
    NettyConfig.getChannelGroup().add(ctx.channel());
  }

  /**
   * 讀取數據
   */
  @Override
  protected void channelRead0(ChannelHandlerContext ctx, TextWebSocketFrame msg) throws Exception {
    log.info("服務器收到消息:{}",msg.text());

    // 獲取用戶ID,關聯channel
    JSONObject jsonObject = JSONUtil.parseObj(msg.text());
    String uid = jsonObject.getStr("uid");
    NettyConfig.getUserChannelMap().put(uid,ctx.channel());

    // 將用戶ID作為自定義屬性加入到channel中,方便隨時channel中獲取用戶ID
    AttributeKey<String> key = AttributeKey.valueOf("userId");
    ctx.channel().attr(key).setIfAbsent(uid);

    // 回復消息
    ctx.channel().writeAndFlush(new TextWebSocketFrame("服務器連接成功!"));
  }

  @Override
  public void handlerRemoved(ChannelHandlerContext ctx) throws Exception {
    log.info("handlerRemoved 被調用"+ctx.channel().id().asLongText());
    // 刪除通道
    NettyConfig.getChannelGroup().remove(ctx.channel());
    removeUserId(ctx);
  }

  @Override
  public void exceptionCaught(ChannelHandlerContext ctx, Throwable cause) throws Exception {
    log.info("異常:{}",cause.getMessage());
    // 刪除通道
    NettyConfig.getChannelGroup().remove(ctx.channel());
    removeUserId(ctx);
    ctx.close();
  }

  /**
   * 刪除用戶與channel的對應關系
   * @param ctx
   */
  private void removeUserId(ChannelHandlerContext ctx){
    AttributeKey<String> key = AttributeKey.valueOf("userId");
    String userId = ctx.channel().attr(key).get();
    NettyConfig.getUserChannelMap().remove(userId);
  }
}

**第四步:**具體消息推送的接口
public interface PushService {
  /**
   * 推送給指定用戶
   * @param userId
   * @param msg
   */
  void pushMsgToOne(String userId,String msg);

  /**
   * 推送給所有用戶
   * @param msg
   */
  void pushMsgToAll(String msg);
}
接口實現類:
import java.util.concurrent.ConcurrentHashMap;

/**
 * @author sixiaojie
 * @date 2020-03-30-20:10
 */
@Service
public class PushServiceImpl implements PushService {

  @Override
  public void pushMsgToOne(String userId, String msg){
    ConcurrentHashMap<String, Channel> userChannelMap = NettyConfig.getUserChannelMap();
    Channel channel = userChannelMap.get(userId);
    channel.writeAndFlush(new TextWebSocketFrame(msg));
  }
  @Override
  public void pushMsgToAll(String msg){
    NettyConfig.getChannelGroup().writeAndFlush(new TextWebSocketFrame(msg));
  }
}
controller:
package com.sixj.nettypush.controller;

import com.sixj.nettypush.service.PushService;
import org.springframework.beans.factory.annotation.Autowired;
import org.springframework.web.bind.annotation.PostMapping;
import org.springframework.web.bind.annotation.RequestMapping;
import org.springframework.web.bind.annotation.RequestParam;
import org.springframework.web.bind.annotation.RestController;

/**
 * @author sixiaojie
 * @date 2020-03-30-20:08
 */
@RestController
@RequestMapping("/push")
public class PushController {

  @Autowired
  private PushService pushService;

  /**
   * 推送給所有用戶
   * @param msg
   */
  @PostMapping("/pushAll")
  public void pushToAll(@RequestParam("msg") String msg){
    pushService.pushMsgToAll(msg);
  }
  /**
   * 推送給指定用戶
   * @param userId
   * @param msg
   */
  @PostMapping("/pushOne")
  public void pushMsgToOne(@RequestParam("userId") String userId,@RequestParam("msg") String msg){
    pushService.pushMsgToOne(userId,msg);
  }
}
第五步:前端html頁面
<!DOCTYPE html>
<html lang="en">
<head>
  <meta charset="UTF-8">
  <title>Title</title>
</head>
<body>
<script>
  var socket;
  // 判斷當前瀏覽器是否支持webSocket
  if(window.WebSocket){
    socket = new WebSocket("ws://192.168.174.25:58080/webSocket")
    // 相當于channel的read事件,ev 收到服務器回送的消息
    socket.onmessage = function (ev) {
      var rt = document.getElementById("responseText");
      rt.value = rt.value + "\n" + ev.data;
    }
    // 相當于連接開啟
    socket.onopen = function (ev) {
      var rt = document.getElementById("responseText");
      rt.value = "連接開啟了..."
      socket.send(
        JSON.stringify({
          // 連接成功將,用戶ID傳給服務端
          uid: "123456"
        })
      );
    }
    // 相當于連接關閉
    socket.onclose = function (ev) {
      var rt = document.getElementById("responseText");
      rt.value = rt.value + "\n" + "連接關閉了...";
    }
  }else{
    alert("當前瀏覽器不支持webSocket")
  }


</script>
  <form onsubmit="return false">
    <textarea id="responseText" ></textarea>
    <input type="button" value="清空內容" onclick="document.getElementById('responseText').value=''">
  </form>
</body>
</html>
目前為止,所有代碼已經寫完了,測試一下
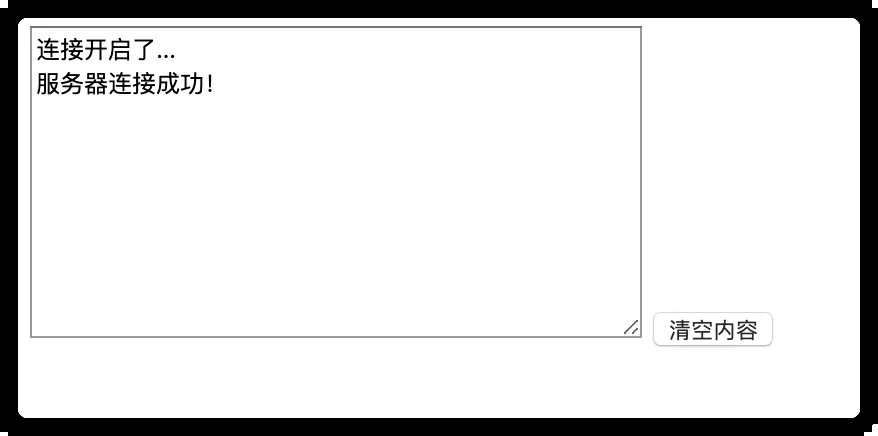
首先運行這個html文件,會看到服務端給前端返回的消息“服務器連接成功了!”,后端日志會打印服務器收到消息:{"uid":"123456"}

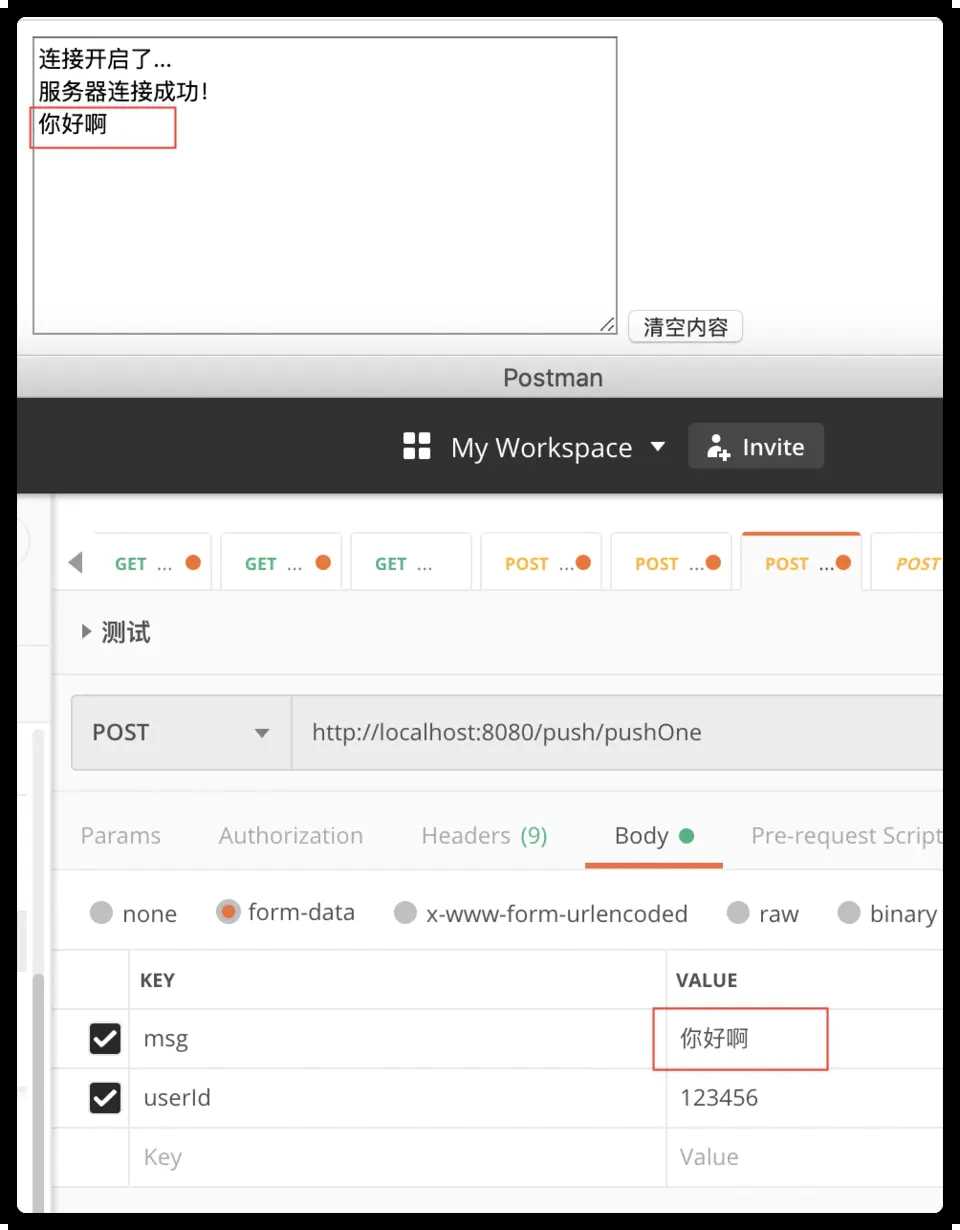
然后使用postman測試推送的接口

測試成功,打完收工
看完上述內容,是不是對SpringBoot+WebSocket+Netty實現消息推送的方法有進一步的了解,如果還想學習更多內容,歡迎關注億速云行業資訊頻道。
免責聲明:本站發布的內容(圖片、視頻和文字)以原創、轉載和分享為主,文章觀點不代表本網站立場,如果涉及侵權請聯系站長郵箱:is@yisu.com進行舉報,并提供相關證據,一經查實,將立刻刪除涉嫌侵權內容。