您好,登錄后才能下訂單哦!
您好,登錄后才能下訂單哦!
這篇文章主要為大家展示了“React優化子組件render怎么用”,內容簡而易懂,條理清晰,希望能夠幫助大家解決疑惑,下面讓小編帶領大家一起研究并學習一下“React優化子組件render怎么用”這篇文章吧。
在react中,父組件的重新render會引發子組件的重新render,但是一些情況下我們會覺得這樣做有些多余,比如:
父組件并未傳遞props給子組件
新傳遞的props渲染結果不變
class A extends React.Component {
  render() {
    console.log('render')
    return <div>這是A組件</div>
  }
}

class Main extends React.Component {
  render() {
    return (
      <div>
        // 點擊button會讓A不斷調用render
        <button onClick={() => this.setState({ a: 1 })}>Main</button>
        <A />
      </div>
    )
  }
}
為了解決這個問題,需要分為ES6類組件和函數式組件兩種:
類組件
使用shouldComponentUpdate來對props和state進行判斷以此決定是否進行render
class A extends React.Component {
  shouldComponentUpdate(nextProps, nextState) {
    //兩次props對比
    return nextProps.a === this.props.a ? false : true
  }
  render() {
    console.log('render')
    return <div>這是A組件</div>
  }
}

class Main extends React.Component {
  // ...
  render() {
    return (
      <div>
        <button onClick={() => this.setState({ a: 1 })}>Main</button>
        <A a={this.state.a} />
      </div>
    )
  }
}
通過返回false來跳過這次更新
使用React.PureComponent,它與React.Component區別在于它已經內置了shouldComponentUpdate來對props和state進行淺對比,并跳過更新
//PureComponent
class A extends React.PureComponent {
  render() {
    console.log('render')
    return <div>這是A組件</div>
  }
}

class Main extends React.Component {
  state = {
    a: 1
  }
  render() {
    return (
      <div>
        <button onClick={() => this.setState({ a: 1 })}>Main</button>
        <A a={this.state.a} />
      </div>
    )
  }
}
函數組件
使用高階組件React.memo來包裹函數式組件,它和類組件的PureComponent類似,也是對對props進行淺比較決定是否更新
const A = props => {
  console.log('render A')
  return <div>這是A組件</div>
}
// React.memo包裹A
const B = React.memo(A)

const Main = props => {
  const [a, setA] = useState(1)
  console.log('render Main')

  return (
    <div>
      // 通過setA(a + 1)讓父組件重新render
      <button onClick={() => setA(a + 1)}>Main</button>
      // 一直傳入相同的props不會讓子組件重新render
      <B a={1} />
    </div>
  )
}
它的第二個參數接受一個兩次props作為參數的函數,返回true則禁止子組件更新
其他
上面提到的淺比較就是根據內存地址判斷是否相同:
// extends React.Component
class A extends React.Component {
  render() {
    console.log('render A')
    console.log(this.props)
    return <div>這是組件A</div>
  }
}

class Main extends React.Component {
  test = [1, 2, 3]
  render() {
    console.log('render Main')
    return (
      <div>
        <button
          onClick={() => {
            // 父組件render
            this.setState({})
            this.test.push(4)
          }}
        >
          Main
        </button>
        <A test={this.test} />
      </div>
    )
  }
}
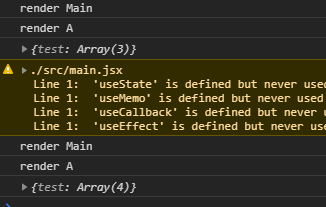
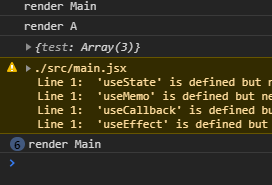
結果是:
使用React.component:

使用React.PureComponent:

使用React.component,點擊之后子組件重新render。改為React.PureComponent之后,點擊button子組件并不會render。也因此,PureComponent根據前后內存地址判斷是否相等,所以向子組件傳遞函數作為props時,使用內聯箭頭函數的形式將會導致子組件的重新render;所以可以用箭頭函數作為成員變量的形式再將函數引用作為props傳遞。
以上是“React優化子組件render怎么用”這篇文章的所有內容,感謝各位的閱讀!相信大家都有了一定的了解,希望分享的內容對大家有所幫助,如果還想學習更多知識,歡迎關注億速云行業資訊頻道!
免責聲明:本站發布的內容(圖片、視頻和文字)以原創、轉載和分享為主,文章觀點不代表本網站立場,如果涉及侵權請聯系站長郵箱:is@yisu.com進行舉報,并提供相關證據,一經查實,將立刻刪除涉嫌侵權內容。