溫馨提示×
您好,登錄后才能下訂單哦!
點擊 登錄注冊 即表示同意《億速云用戶服務條款》
您好,登錄后才能下訂單哦!
小編給大家分享一下微信小程序如何實現一張或多張圖片上傳,相信大部分人都還不怎么了解,因此分享這篇文章給大家參考一下,希望大家閱讀完這篇文章后大有收獲,下面讓我們一起去了解一下吧!
一、簡介:
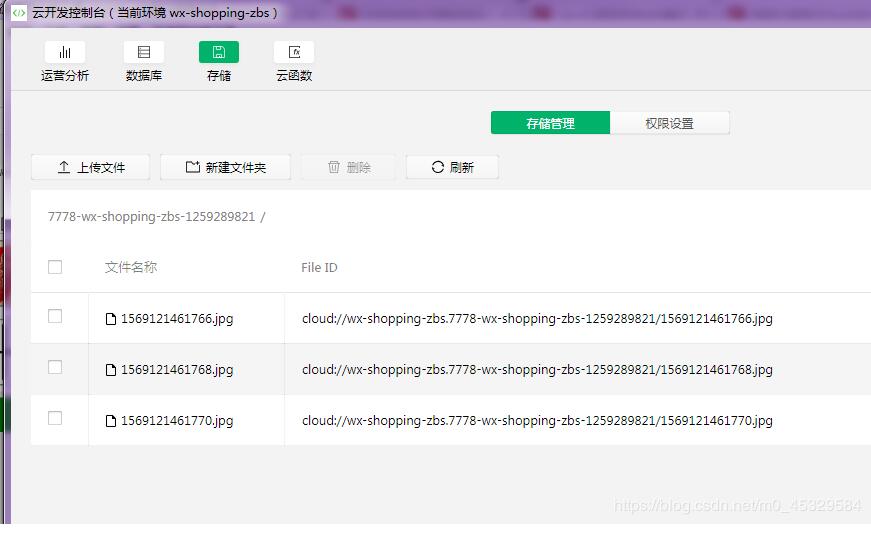
這篇文章向大家展示的是把圖片上傳到云數據庫中,這是我做商城項目時研究的。大家都知道,云開發是沒有后端開發的,所有圖片我們要放到云數據庫中。
二、素材圖:
 :
:
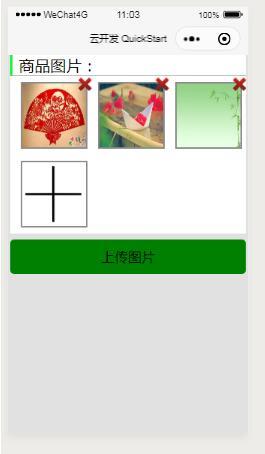
三、效果圖:


四、代碼:
wxml:
<!--miniprogram/pages/fb/fb.wxml-->
<view class='pages'>
 <view class='top'><text class='top_name'>商品圖片:</text></view>
 <!-- 圖片 -->
 <view class="images_box">
  <block wx:key="imgbox" wx:for="{{imgbox}}">
   <view class='img-box'>
    <image class='img' src='{{item}}'></image>
    <view class='img-delect' data-deindex='{{index}}' bindtap='imgDelete1'>
     <image class='img' src='../../images/delect.png'></image>
    </view>
   </view>
  </block>
  <view class='img-box' bindtap='addPic1' wx:if="{{imgbox.length<9}}">
   <image class='img' src='../../images/add_image.png'></image>
  </view>
 </view>
 <button bindtap='fb'>上傳圖片</button>
</view>
wxss:
/* miniprogram/pages/fb/fb.wxss */
page{
 background-color: rgba(200, 198, 201, 0.527);
}
.pages{
 width: 98%;
 margin: auto;
 overflow: hidden;
}
.top{
 width: 100%;
 overflow: hidden;
 margin: auto;
 font-size: 50rpx;
 background-color: white;
 border-left: 8rpx solid rgb(9, 245, 60);
 border-bottom: 1rpx solid rgba(117, 116, 116, 0.527);
}
.top_name{
 margin-left: 20rpx;
}
/* 圖片 */
.images_box{
 width: 100%;
 display: flex;
 flex-direction: row;
 flex-wrap: wrap;
 justify-content: flex-start;
 background-color: white;
}
.img-box{
 border: 5rpx;
 border-style: solid;
 border-color: rgba(0, 0, 0, 0.452);
 width: 200rpx;
 height: 200rpx;
 margin-left: 35rpx;
 margin-top: 20rpx;
 margin-bottom: 20rpx;
 position: relative;
}
/* 刪除圖片 */
.img-delect{
 width:50rpx;
 height:50rpx;
 border-radius:50%;
 position:absolute;
 right:-20rpx;
 top:-20rpx;
}
.img{
 width: 100%;
 height: 100%;
}
.jiage{
 height: 60rpx;
 width: 90%;
 margin-left: 5%;
 margin-right: 5%;
 background-color: white;
 display: flex;
 justify-content: flex-start;
}
.rmb{
 width: 280rpx;
 border: 2rpx solid rgb(199, 197, 197);
}
button{
 margin-top: 20rpx;
 background-color: green;
}
.radio-group{
 display: flex;
}
js:
// pages/fb/fb.js
const app = getApp()
const db = wx.cloud.database();//初始化數據庫
Page({
 /**
  * 頁面的初始數據
  */
 data: {
  imgbox: [],//選擇圖片
  fileIDs: [],//上傳云存儲后的返回值
 },

 // 刪除照片 &&
 imgDelete1: function (e) {
  let that = this;
  let index = e.currentTarget.dataset.deindex;
  let imgbox = this.data.imgbox;
  imgbox.splice(index, 1)
  that.setData({
   imgbox: imgbox
  });
 },
 // 選擇圖片 &&&
 addPic1: function (e) {
  var imgbox = this.data.imgbox;
  console.log(imgbox)
  var that = this;
  var n = 5;
  if (5 > imgbox.length > 0) {
   n = 5 - imgbox.length;
  } else if (imgbox.length == 5) {
   n = 1;
  }
  wx.chooseImage({
   count: n, // 默認9,設置圖片張數
   sizeType: ['original', 'compressed'], // 可以指定是原圖還是壓縮圖,默認二者都有
   sourceType: ['album', 'camera'], // 可以指定來源是相冊還是相機,默認二者都有
   success: function (res) {
    // console.log(res.tempFilePaths)
    // 返回選定照片的本地文件路徑列表,tempFilePath可以作為img標簽的src屬性顯示圖片
    var tempFilePaths = res.tempFilePaths

    if (imgbox.length == 0) {
     imgbox = tempFilePaths
    } else if (5 > imgbox.length) {
     imgbox = imgbox.concat(tempFilePaths);
    }
    that.setData({
     imgbox: imgbox
    });
   }
  })
 },

 //圖片
 imgbox: function (e) {
  this.setData({
   imgbox: e.detail.value
  })
 },


 //發布按鈕
 fb: function (e) {
  if (!this.data.imgbox.length) {
   wx.showToast({
    icon: 'none',
    title: '圖片類容為空'
   });
  } else {
    //上傳圖片到云存儲
    wx.showLoading({
     title: '上傳中',
    })
    let promiseArr = [];
    for (let i = 0; i < this.data.imgbox.length; i++) {
     promiseArr.push(new Promise((reslove, reject) => {
      let item = this.data.imgbox[i];
      let suffix = /\.\w+$/.exec(item)[0];//正則表達式返回文件的擴展名
      wx.cloud.uploadFile({
       cloudPath: new Date().getTime() + suffix, // 上傳至云端的路徑
       filePath: item, // 小程序臨時文件路徑
       success: res => {
        this.setData({
         fileIDs: this.data.fileIDs.concat(res.fileID)
        });
        console.log(res.fileID)//輸出上傳后圖片的返回地址
        reslove();
        wx.hideLoading();
        wx.showToast({
         title: "上傳成功",
        })
       },
       fail: res=>{
        wx.hideLoading();
        wx.showToast({
         title: "上傳失敗",
        })
       }

      })
     }));
    }
    Promise.all(promiseArr).then(res => {//等數組都做完后做then方法
     console.log("圖片上傳完成后再執行")
     this.setData({
      imgbox:[]
     })
    })

   }
 },

})
以上是“微信小程序如何實現一張或多張圖片上傳”這篇文章的所有內容,感謝各位的閱讀!相信大家都有了一定的了解,希望分享的內容對大家有所幫助,如果還想學習更多知識,歡迎關注億速云行業資訊頻道!
免責聲明:本站發布的內容(圖片、視頻和文字)以原創、轉載和分享為主,文章觀點不代表本網站立場,如果涉及侵權請聯系站長郵箱:is@yisu.com進行舉報,并提供相關證據,一經查實,將立刻刪除涉嫌侵權內容。