您好,登錄后才能下訂單哦!
您好,登錄后才能下訂單哦!
小編這次要給大家分享的是詳解python中SMTP如何實現自動發送郵件,文章內容豐富,感興趣的小伙伴可以來了解一下,希望大家閱讀完這篇文章之后能夠有所收獲。
最近工作中的一個項目需要自動發送一些信息郵件到指定郵箱的需求,那么如何實現Python自動發送郵件的功能呢?接下來我們就來簡單的介紹下如何利用Python來實現自動發送郵件的功能。
Python SMTP發送郵件
SMTP(Simple Mail Transfer Protocol)即簡單郵件傳輸協議 ,說白了就是發送郵件的協議,python的smplib庫對SMTP協議進行了簡單的封裝,提供了對SMTP的支持,可以發送純文本郵件、HTML文件以及帶附件的郵件。
首先我們構建一個SendEmailManager類,也是遵循著面向對象編程的思想來做,大體結構如下:
class SendEmailManager(object):

  def __init__(self, **kwargs):
    # 初始化參數
    ...

  def _get_conf(self, key):
    # 獲取配置參數
    ...

  def _init_conf(self):
    # 初始化配置參數
    ...

  def _login_email(self):
    # 登錄郵箱服務器
    ...
  def _make_mail_msg(self):
    # 構建文本郵件對象
    ...

  def do_send_mail(self):
    # 郵件發送
    ...
def __init__(self, **kwargs)
類的初始化函數,可以用來設置對象屬性,并給予初始值,可以是參數或者固定值 ,其中參數**kwargs是將一個可變的關鍵字參數的字典傳給函數實參,這里里我們主要是對SMTP服務器(這里使用qq郵箱)、發送郵件的代理郵箱、在郵箱中設置的客戶端授權密碼、可變參數進行一些初始化。具體代碼如下:
# SMTP服務器,這里使用qq郵箱,其他郵箱自行百度
EMAIL_HOST = 'smtp.qq.com'
# 發送郵件的代理郵箱
EMAIL_HOST_USER = 'xxxx@xxxx.com'
# 在郵箱中設置的客戶端授權密碼, 注意這里不是郵箱密碼,如何獲取郵箱授權碼,請看本文最后教程
EMAIL_HOST_PASSWORD = 'xxxxxxxxxxxxx'
def __init__(self, **kwargs):
  # 初始化參數
  self.email_host = EMAIL_HOST
  self.email_host_user = EMAIL_HOST_USER
  self.email_host_pass = EMAIL_HOST_PASSWORD
  self.kwargs = kwargs
def _get_conf(self, key)
主要負責通過key讀取 可變參數self.kwargs 字典里的值,供其他函數使用。
def _get_conf(self, key):
  # 獲取配置參數
  value = self.kwargs.get(key)
  if key != "attach_file_list" and (value is None or value == ''):
    raise Exception("configuration parameter '%s' cannot be empty" % key)
  return value
def _init_conf(self)
該函數主要負責初始化 函數_get_conf 返回的配置參數, 以便接下來的函數可以調用相關配置參數。
def _init_conf(self):
  # 初始化配置參數
  print(self._get_conf('receives'))
  self.receives = self._get_conf('receives')
  self.msg_subject = self._get_conf('msg_subject')
  self.msg_content = self._get_conf('msg_content')
  self.msg_from = self._get_conf('msg_from')
  # attachment
  self.attach_file_list = self._get_conf('attach_file_list')
def _login_email(self)
登錄郵件服務器, 我這里登陸的是qq郵箱的服務器,端口號為465,其他郵箱端口號請自行百度,代碼如下:
def _login_email(self):
  # 登錄郵箱服務器
  try:
    server = smtplib.SMTP_SSL(self.email_host, port=465)
    # set_debuglevel(1)可以打印出和SMTP服務器交互的所有信息
    server.set_debuglevel(1)
    # 登錄郵箱
    server.login(self.email_host_user, self.email_host_pass)
    return server
  except Exception as e:
    print("mail login exception:", e)
    raise e
def _make_mail_msg(self)
該函數的功能為構建一個郵件實例對象,來處理郵件的內容。一封正常的郵件一般有收發件者信息,郵件主題,郵件正文,有些郵件還附帶有附件,具體的設置參見如下代碼:
def _make_mail_msg(self):
  # 構建郵件對象
  msg = MIMEMultipart()
  msg.attach(MIMEText(self.msg_content, 'plain', 'utf-8'))
  # 郵件主題
  msg['Subject'] = Header(self.msg_subject, "utf-8")
  # 發件人郵箱信息
  msg['From'] = "<%s>" % self.msg_from
  # msg['From'] = Header(self.msg_from + "<%s>" % self.email_host_user, "utf-8")
  msg['To'] = ",".join(self.receives)
  print("---", self.attach_file_list)
  if self.attach_file_list:
    for i, att in enumerate(self.attach_file_list):
      # 構造附件,傳送當前目錄下的文件
      if not att:
        break
      att_i = MIMEText(open(att, 'rb').read(), 'base64', 'utf-8')
      att_i["Content-Type"] = 'application/octet-stream'
      # 這里的filename可以任意寫,寫什么名字,郵件中顯示什么名字
      att_i["Content-Disposition"] = 'attachment; filename="%s"' % att
      msg.attach(att_i)
  return msg
def do_send_mail(self)
發送郵件,就是把上幾個函數串起來,直接上代碼:
def do_send_mail(self):
  # 郵件發送
  try:
    self._init_conf()
    server = self._login_email()
    msg = self._make_mail_msg()
    server.sendmail(self.email_host_user, self.receives, msg.as_string())
    server.close()
    print("發送成功!")
  except Exception as e:
    print("郵件發送異常", e)
配置參數,測試能否正常發送郵件:
if __name__ == "__main__":
  mail_conf = {
    'msg_from': 'xxxx@qq.com', # 郵件發送者的地址
    'receives': ['xxxx@qq.com', 'xxxxxxxx@xxxx.com', ], # 郵件接收者的地址,這是個list,因為郵件的接收者可能不止一個
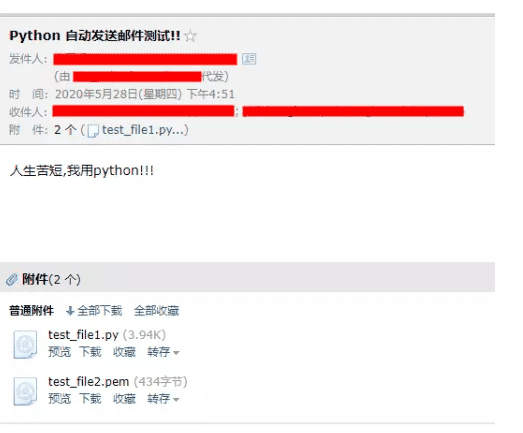
    'msg_subject': 'Python 自動發送郵件測試!!', # 郵件的主題
    'msg_content': '人生苦短,我用python!!!', # 郵件的內容
    'attach_file_list': {"test_file1.py": "test.py", "test_file2.pem": "./public.pem"}, # 為附件文件路徑列表,也是個list,也可沒有這項
  }

  manager = SendEmailManager(**mail_conf)
  manager.do_send_mail()
ok,發送成功,添加附件也是沒問題的。
開始我們講的獲取客戶端郵箱的授權碼,教程如下(以qq郵箱為例):

好了,目標完成。
看完這篇關于詳解python中SMTP如何實現自動發送郵件的文章,如果覺得文章內容寫得不錯的話,可以把它分享出去給更多人看到。
免責聲明:本站發布的內容(圖片、視頻和文字)以原創、轉載和分享為主,文章觀點不代表本網站立場,如果涉及侵權請聯系站長郵箱:is@yisu.com進行舉報,并提供相關證據,一經查實,將立刻刪除涉嫌侵權內容。