您好,登錄后才能下訂單哦!
您好,登錄后才能下訂單哦!
這篇文章主要介紹了C# 如何實現截圖功能,具有一定借鑒價值,需要的朋友可以參考下。希望大家閱讀完這篇文章后大有收獲。下面讓小編帶著大家一起了解一下。
思路:
截取屏幕圖片。
獲取要截取的范圍,即左上角,右下角坐標
填充到PictureBox中。
筆觸功能,熒光筆,矩形,橡皮擦,復制,保存功能
涉及的知識點:
MenuStrip:為窗體提供菜單系統。以ToolStripMenuItem為菜單子選項
ToolStrip:為 Windows 工具欄對象提供容器。以ToolStripButton【表示包含文本和圖像的可選】為工具欄子元素
PictureBox:表示用于顯示圖像的 Windows 圖片框控件。不過本文對此空間進行了重寫
Screen:可用于獲取工作屏幕區域
Graphics:封裝一個 GDI+ 繪圖圖面。此類不能被繼承。此類的CopyFromScreen方法用于獲取屏幕圖像
鼠標事件:包括MouseDown,MouseMove,MouseUp事件,通過MouseEventArgs中的Location獲取鼠標的位置。
Clipboard: 提供將數據置于系統剪貼板中以及從中檢索數據的方法。此類不能被繼承。
Cursor:設置鼠標的顯示的光標的樣式。
OnPaint:重繪事件,當控件刷新時響應此事件。
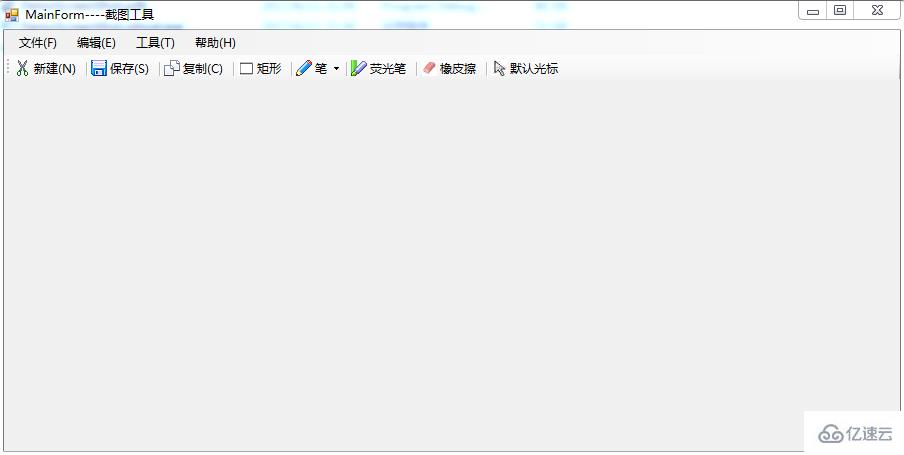
效果圖如下【主要實現了截圖,保存,復制,畫矩形,筆觸,熒光筆,橡皮擦等功能】:

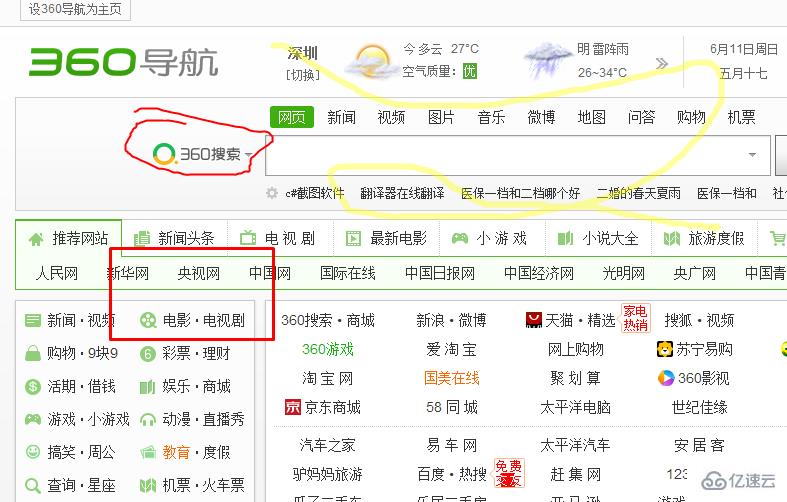
保存后圖片如下:

-------------------------------------------------------------------------------------------------------------------------------
核心代碼如下:
截取屏幕圖像:
1 public Bitmap GetScreen() 2 { 3 //獲取整個屏幕圖像,不包括任務欄 4 Rectangle ScreenArea = Screen.GetWorkingArea(this); 5 Bitmap bmp = new Bitmap(ScreenArea.Width, ScreenArea.Height); 6 using (Graphics g = Graphics.FromImage(bmp)) 7 { 8 g.CopyFromScreen(0, 0, 0, 0, new Size(ScreenArea.Width,ScreenArea.Height)); 9 }10 return bmp;11 }繪制圖形功能:
1 #region 繪制功能 2 3 protected override void OnPaint(PaintEventArgs pe) 4 { 5 base.OnPaint(pe); 6 Graphics g = pe.Graphics; 7 DrawHistory(g); 8 //繪制當前線 9 if (startDraw && this.curLine.PointList != null && this.curLine.PointList.Count > 0) 10 { 11 DrawLine(g,this.curLine); 12 } 13 if (startDraw && this.curRect.Start != null && this.curRect.End != null && this.curRect.Start != this.curRect.End) { 14 DrawRectangle(g, this.curRect); 15 } 16 } 17 18 public void DrawHistory(Graphics g) { 19 //繪制線歷史記錄 20 if (LineHistory != null) 21 { 22 foreach (HLine lh in LineHistory) 23 { 24 if (lh.PointList.Count > 10) 25 { 26 DrawLine(g, lh); 27 } 28 } 29 } 30 //繪制矩形歷史記錄 31 if (RectHistory != null) 32 { 33 foreach (HRectangle lh in RectHistory) 34 { 35 if (lh.Start!=null&& lh.End!=null && lh.Start!=lh.End) 36 { 37 DrawRectangle(g, lh); 38 } 39 } 40 } 41 } 42 43 /// <summary> 44 /// 繪制線 45 /// </summary> 46 /// <param name="g"></param> 47 /// <param name="line"></param> 48 private void DrawLine(Graphics g,HLine line) { 49 g.SmoothingMode = SmoothingMode.AntiAlias; 50 using (Pen p = new Pen(line.LineColor, line.LineWidth)) 51 { 52 //設置起止點線帽 53 p.StartCap = LineCap.Round; 54 p.EndCap = LineCap.Round; 55 56 //設置連續兩段的聯接樣式 57 p.LineJoin = LineJoin.Round; 58 g.DrawCurve(p, line.PointList.ToArray()); //畫平滑曲線 59 } 60 } 61 62 /// <summary> 63 /// 繪制矩形 64 /// </summary> 65 /// <param name="g"></param> 66 /// <param name="rect"></param> 67 private void DrawRectangle(Graphics g, HRectangle rect) 68 { 69 g.SmoothingMode = SmoothingMode.AntiAlias; 70 using (Pen p = new Pen(rect.LineColor, rect.LineWidth)) 71 { 72 //設置起止點線帽 73 p.StartCap = LineCap.Round; 74 p.EndCap = LineCap.Round; 75 76 //設置連續兩段的聯接樣式 77 p.LineJoin = LineJoin.Round; 78 g.DrawRectangle(p, rect.Start.X, rect.Start.Y, rect.End.X - rect.Start.X, rect.End.Y - rect.Start.Y); //畫平滑曲線 79 } 80 } 81 82 public void Earser(Point p0) 83 { 84 for (int i = lineHistory.Count - 1; i >= 0; i--) 85 { 86 HLine line = lineHistory[i]; 87 bool flag = false; 88 foreach (Point p1 in line.PointList) 89 { 90 double distance = GetDistance(p0, p1); 91 if (Math.Abs(distance) < 6) 92 { 93 //需要刪除 94 flag = true; 95 break; 96 } 97 98 } 99 if (flag)100 {101 lineHistory.RemoveAt(i);102 }103 }104 //擦除矩形105 for (int i = rectHistory.Count - 1; i >= 0; i--)106 {107 HRectangle rect = rectHistory[i];108 109 if (p0.X>rect.Start.X && p0.X<rect.End.X && p0.Y > rect.Start.Y && p0.Y < rect.End.Y) {110 111 rectHistory.RemoveAt(i);112 }113 }114 }115 116 /// <summary>117 /// 獲取兩點之間的距離118 /// </summary>119 /// <param name="p0"></param>120 /// <param name="p1"></param>121 /// <returns></returns>122 private double GetDistance(Point p0, Point p1) {123 return Math.Sqrt(Math.Pow((p0.X - p1.X), 2) + Math.Pow((p0.Y - p1.Y), 2));124 }125 126 #endregion感謝你能夠認真閱讀完這篇文章,希望小編分享C# 如何實現截圖功能內容對大家有幫助,同時也希望大家多多支持億速云,關注億速云行業資訊頻道,遇到問題就找億速云,詳細的解決方法等著你來學習!
免責聲明:本站發布的內容(圖片、視頻和文字)以原創、轉載和分享為主,文章觀點不代表本網站立場,如果涉及侵權請聯系站長郵箱:is@yisu.com進行舉報,并提供相關證據,一經查實,將立刻刪除涉嫌侵權內容。