您好,登錄后才能下訂單哦!
您好,登錄后才能下訂單哦!
作為大多數剛接觸Android應用開發的人來說,在一個強大的Activity類中,就可以完成豐富多彩的UI工作,但是雜亂的屏幕分辨率,使得本來好不容易寫好的UI,變得不堪入目。。。該怎么辦那?
查閱了好多資料,才發現,原來我out了! 早在Android在3.0版本就引入了Fragment(碎片)功能,它非常類似于Activity,可以像Activity一樣包含布局,通過將Activity 的布局分散到frament 中,可以在運行時修改activity 的外觀,并且由activity 管理的back stack 中保存些變化,很巧妙的解決了不同分辨率手機上UI差異變化的問題。總結一下吧!
一.Fragment介紹:
官方文檔:http://developer.android.com/guide/components/fragments.html

Fragment是我們在單個Activity上要切換多個UI界面時,要顯示的不同內容。模塊化這些UI面板可以提供給其他Acitivity來使用,因此我們可以簡單地把Fragment看成類似于TextView控件一樣,可以被任意的Activity進行加載。
1.靜態加載:
首先,在Layout下建立兩個xml
fragment1.xml:
<?xml version="1.0" encoding="utf-8"?>
<LinearLayout xmlns:android="http://schemas.android.com/apk/res/android"
    android:layout_width="match_parent"
    android:layout_height="match_parent"
    android:orientation="vertical"
    android:background="#000000"  >
    <TextView
        android:id="@+id/textView1"
        android:layout_width="wrap_content"
        android:layout_height="wrap_content"
        android:text="我是Fragment1"
        />
</LinearLayout>
fragment2.xml:
<?xml version="1.0" encoding="utf-8"?>
<LinearLayout xmlns:android="http://schemas.android.com/apk/res/android"
    android:layout_width="match_parent"
    android:layout_height="match_parent"
    android:orientation="vertical"
    android:background="#0000ff">
    <TextView
        android:id="@+id/textView1"
        android:layout_width="wrap_content"
        android:layout_height="wrap_content"
        android:text="我是Fragment2" />
</LinearLayout>
之后建立兩個類:
FragmentFirst類:
package com.zhf.android_fragmentdemo;
import android.app.Fragment;
import android.os.Bundle;
import android.view.LayoutInflater;
import android.view.View;
import android.view.ViewGroup;
public class FragmentFirst extends Fragment {
    @Override
    public View onCreateView(LayoutInflater inflater, ViewGroup container,
            Bundle savedInstanceState) {
        return inflater.inflate(R.layout.fragment1, container, false);
    }
}
FragmentSecond類:
package com.zhf.android_fragmentdemo;
import android.app.Fragment;
import android.os.Bundle;
import android.view.LayoutInflater;
import android.view.View;
import android.view.ViewGroup;
public class FragmentSecond extends Fragment {
    @Override
    public View onCreateView(LayoutInflater inflater, ViewGroup container,
            Bundle savedInstanceState) {
        return inflater.inflate(R.layout.fragment2, container, false);
    }
}
最后一步就是在activity_main.xml中應用這兩個布局文件:
<LinearLayout xmlns:android="http://schemas.android.com/apk/res/android"
    android:layout_width="match_parent"
    android:layout_height="match_parent"
    android:orientation="horizontal" >
    <fragment
        android:id="@+id/fragment1"
        android:name="com.zhf.android_fragmentdemo.FragmentSecond"
        android:layout_width="0dip"
        android:layout_height="match_parent"
        android:layout_weight="1" />
    <fragment
        android:id="@+id/fragment2"
        android:name="com.zhf.android_fragmentdemo.FragmentFirst"
        android:layout_width="0dip"
        android:layout_height="match_parent"
        android:layout_weight="1" />
</LinearLayout>
主類MainActivity中不用添加其他代碼,直接加載activity_main.xml即可。
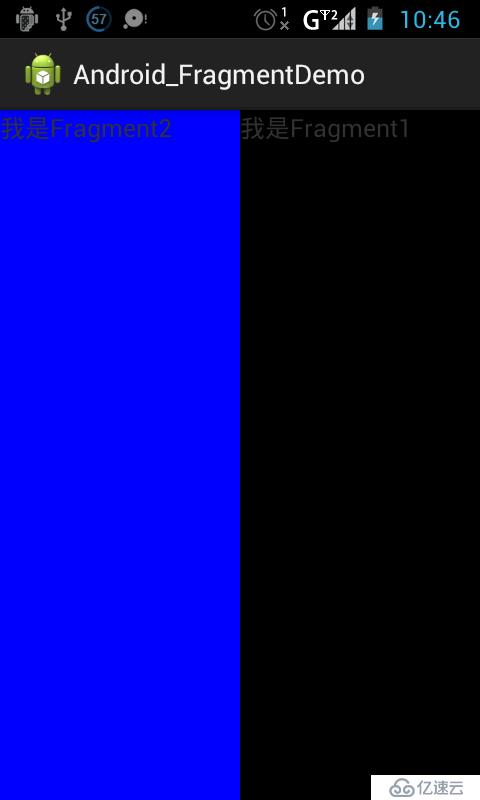
效果圖:

ok!簡單三步就將fragment加載進去了,當然這只是fragment的一小部分功能,它的強大之處其實在于:Activity能夠根據自身情況來動態的加載fragemnt,使你的UI界面變得更加多樣可變!
2.動態加載:(重點)
首先,現將activity_main.xml中多余部分去掉:
<LinearLayout xmlns:android="http://schemas.android.com/apk/res/android"
    android:id="@+id/main_layout"
    android:layout_width="match_parent"
    android:layout_height="match_parent"
    android:orientation="horizontal" >
</LinearLayout>
其次,就是在MainActivity類中動態添加這兩個Fragment類:
package com.zhf.android_fragmentdemo;
import android.app.Activity;
import android.os.Bundle;
import android.view.Display;
public class MainActivity extends Activity {
    @Override
    protected void onCreate(Bundle savedInstanceState) {
        super.onCreate(savedInstanceState);
        setContentView(R.layout.activity_main2);
        Display display = getWindowManager().getDefaultDisplay();
        if (display.getWidth() > display.getHeight()) {
            FragmentFirst fragmentFirst = new FragmentFirst();
            getFragmentManager().beginTransaction()
                    .replace(R.id.main_layout, fragmentFirst).commit();
        } else {
            FragmentSecond fragmentSecond = new FragmentSecond();
            getFragmentManager().beginTransaction()
                    .replace(R.id.main_layout, fragmentSecond).commit();
        }
    }
}
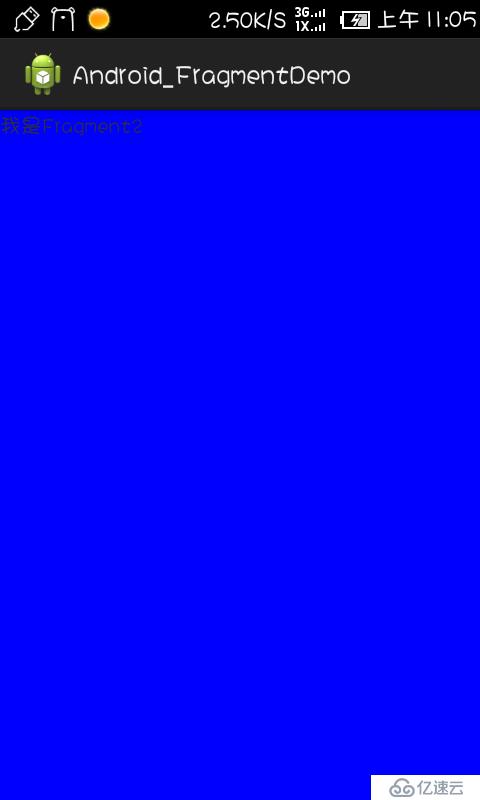
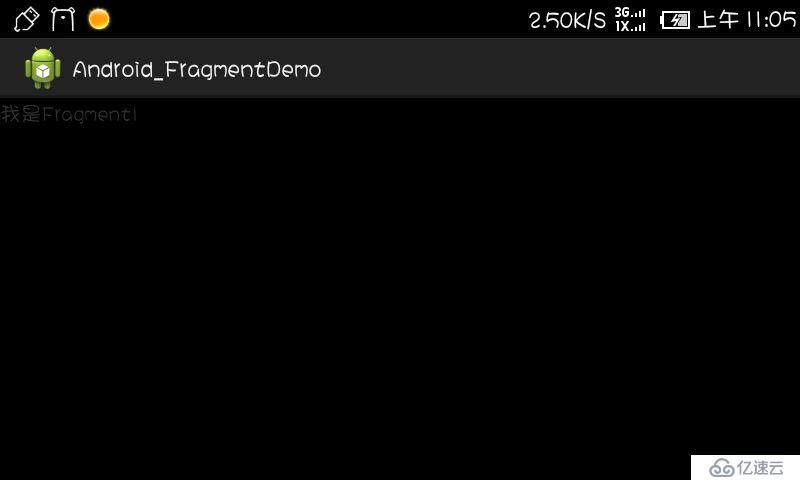
運行一下,效果出來了,為了體現出動態,大家可以試著把手機自動轉屏打開,轉一下屏試試!
 ----轉屏之后--->
注:動態加載過程步驟
1.獲取到FragmentManager,在Activity中可以直接通過getFragmentManager得到。
2.調用beginTransaction方法開啟一個事務。
3.向容器內加入Fragment,一般使用replace方法實現,需要傳入容器的id和Fragment的實例。
4.提交事務,調用commit方法提交。
介紹完這兩種方式,大家是不是已經對其有了一些感性的認識,這里注意一下Fragment是在3.0版本引入的,如果你使用的是3.0之前的系統,需要先導入android-support-v4的jar包才能使用Fragment功能,這里可能需要繼承FragmengActivity(現在建立低版本項目時,ADT會自動將libs下的android-support-v4.jar構建到項目路徑)
接下來我們具體挖掘一下生命周期及其Fragment中一些主要方法的介紹!
二.Fragment類的生命周期
復寫fragment中的方法,測試一下它的生命周期看看它與Activity的異同。
package com.zhf.android_fragmentdemo;
import android.app.Activity;
import android.app.Fragment;
import android.os.Bundle;
import android.view.LayoutInflater;
import android.view.View;
import android.view.ViewGroup;
/**
 * Fragment的生命周期
 *     注意: 方法中的排列次序即為fragment全過程:啟動時方法調用次序 + 退出時方法調用次序
 * @author ZHF
 *
 */
public class FragmentFirst extends Fragment {

    /**Fragment和Activity建立關聯的時候調用**/
    @Override
    public void onAttach(Activity activity) {
        super.onAttach(activity);
        System.out.println("onAttach");
    }

    @Override
    public void onCreate(Bundle savedInstanceState) {
        super.onCreate(savedInstanceState);
        System.out.println("onCreate");
    }
    /**為Fragment加載布局時調用**/
    @Override
    public View onCreateView(LayoutInflater inflater, ViewGroup container,
            Bundle savedInstanceState) {
        System.out.println("onCreateView");
        return inflater.inflate(R.layout.fragment1, container, false);
    }

    /**當Activity中的onCreate方法執行完后調用**/
    @Override
    public void onActivityCreated(Bundle savedInstanceState) {
        super.onActivityCreated(savedInstanceState);
        System.out.println("onActivityCreated");
    }

    @Override
    public void onStart() {
        super.onStart();
        System.out.println("onStart");
    }
    @Override
    public void onResume() {
        super.onResume();
        System.out.println("onResume");
    }
    @Override
    public void onPause() {
        super.onPause();
        System.out.println("onPause");
    }
    @Override
    public void onStop() {
        super.onStop();
        System.out.println("onStop");
    }
    /**Fragment中的布局被移除時調用**/
    @Override
    public void onDestroyView() {
        super.onDestroyView();
        System.out.println("onDestroyView");
    }
    @Override
    public void onDestroy() {
        super.onDestroy();
        System.out.println("onDestroy");
    }
    /**Fragment和Activity解除關聯的時候調用**/
    @Override
    public void onDetach() {
        super.onDetach();
        System.out.println("onDetach");
    }
}
打印結果:
1.運行一下:

2.返回退出:

3.Home鍵退出:

4.再次進入:

通過打印的結果,我們應該可以清楚的了解到其實fragment和Activity的生命周期還是很相似的
(Activity生命周期博客:http://smallwoniu.blog.51cto.com/blog/3911954/1246732)
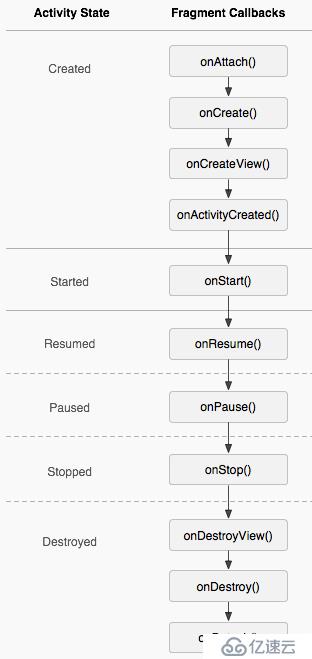
官網截圖:

三.Fragment中有幾個重要的回調方法
| 方法 | 描述 |
| onAttach() | Fragment和Activity建立關聯的時候調用 |
| onCreateView() | 為Fragment加載布局時調用 |
| onActivityCreated() | 當Activity中的onCreate方法執行完后調用 |
| onDestroyView() | Fragment中的布局被移除時調用 |
| onDetach() | Fragment和Activity解除關聯的時候調用 |
只有掌握了Fragment中這幾個重要的方法,在使用的過程中才能更加靈活的與Activity配套使用,動態加載以適應不同屏幕分辨率的狀況!
ok! 因為本人也是剛接觸Fragment時間不長,這里也是查閱了許多的資料,簡單總結了一番,方便以后查閱,希望能幫助到剛接觸fragment的人。
在下一篇博客中我會使用Fragment+ViewPager寫一個動態加載數據庫的綜合的案例,歡迎大家查閱!
免責聲明:本站發布的內容(圖片、視頻和文字)以原創、轉載和分享為主,文章觀點不代表本網站立場,如果涉及侵權請聯系站長郵箱:is@yisu.com進行舉報,并提供相關證據,一經查實,將立刻刪除涉嫌侵權內容。